How to Draw from Imagination
Updated: 23 Apr 2026
In this guide, I focus on the minimum necessary basics you need to know for drawing from imagination.
Drawing from imagination means the knowledge to draw the basic shapes from different angles (in perspective) and the way to present them (rendering).
After getting the structure right, render is the final result with consideration to materials, lighting, texture (including color), shadows, and reflections.
Note:
This guide focuses mainly on drawing objects, both for concept art and for product design.
The Basics:
The Craft:
Boxes
If you do not have some basic understanding of linear perspective, visit my beginners guide to linear perspective.
Here, I highlight the important and most practical things you need to know.
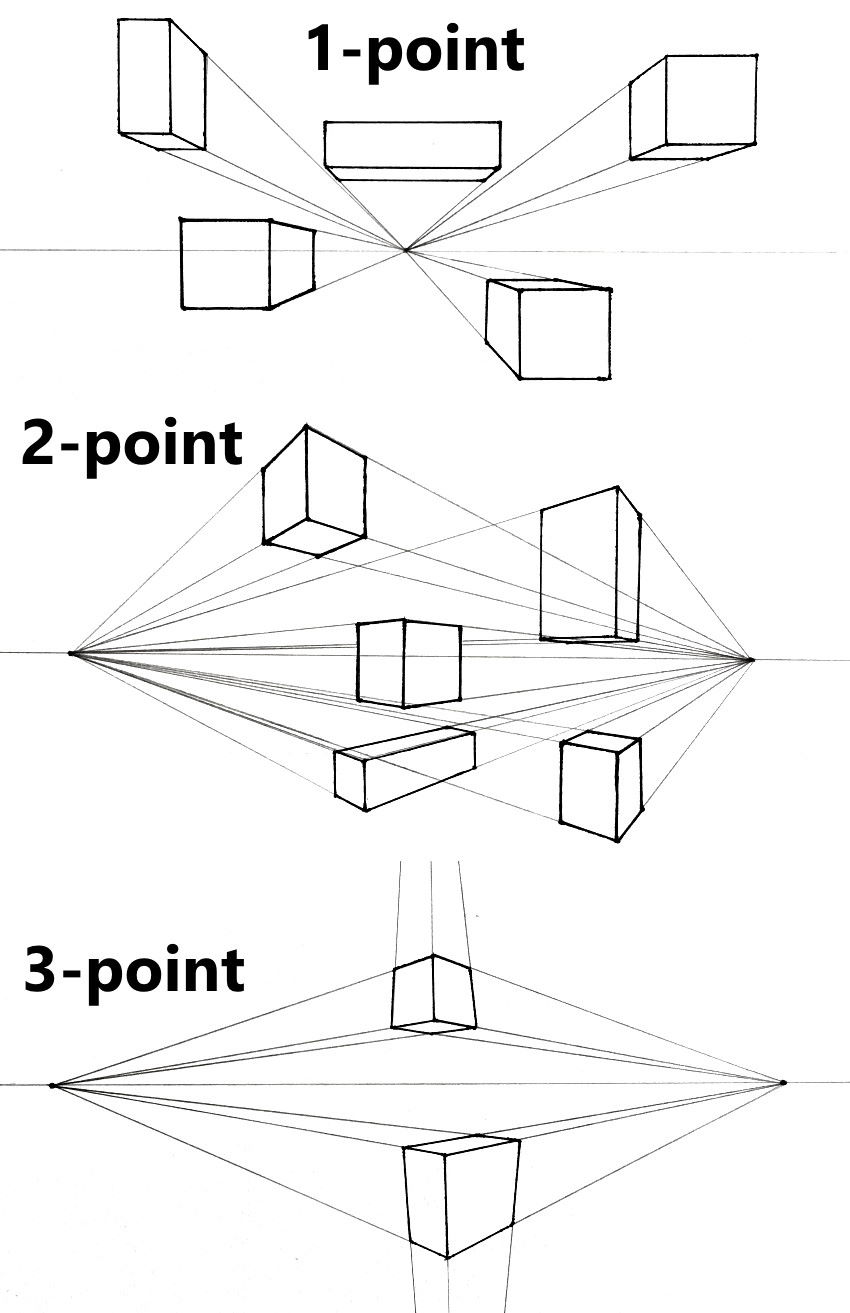
Start by drawing some boxes in 1-, 2-, and 3-point perspective.
Draw them above, on, and below the horizon line:
Next, draw some boxes from imagination, but with attention to perspective.
They do not have to be perfect, just to get used to drawing in freehand style, meaning with no ruler or vanishing points (imagine where the vanishing points should be).
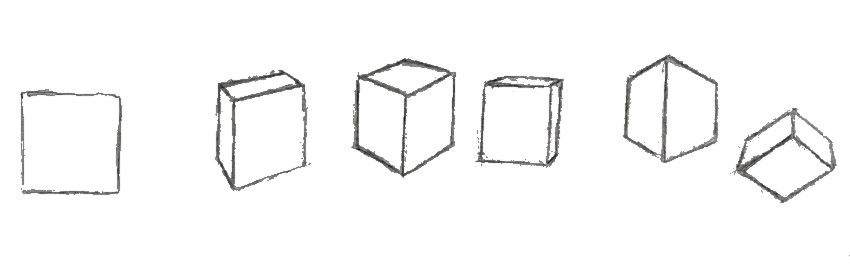
If you struggle with drawing boxes, remember that every set of lines (which are parallel in real life) converges in perspective.
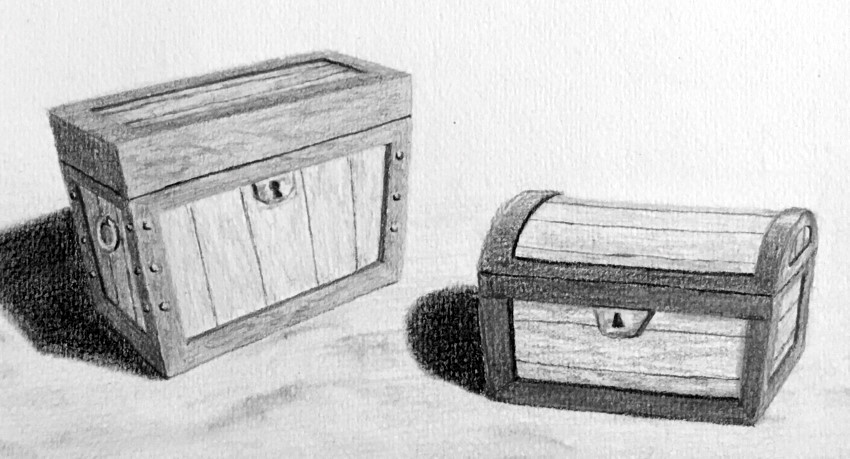
The following is an example of drawing simple boxes from imagination and turning them into treasure chests.
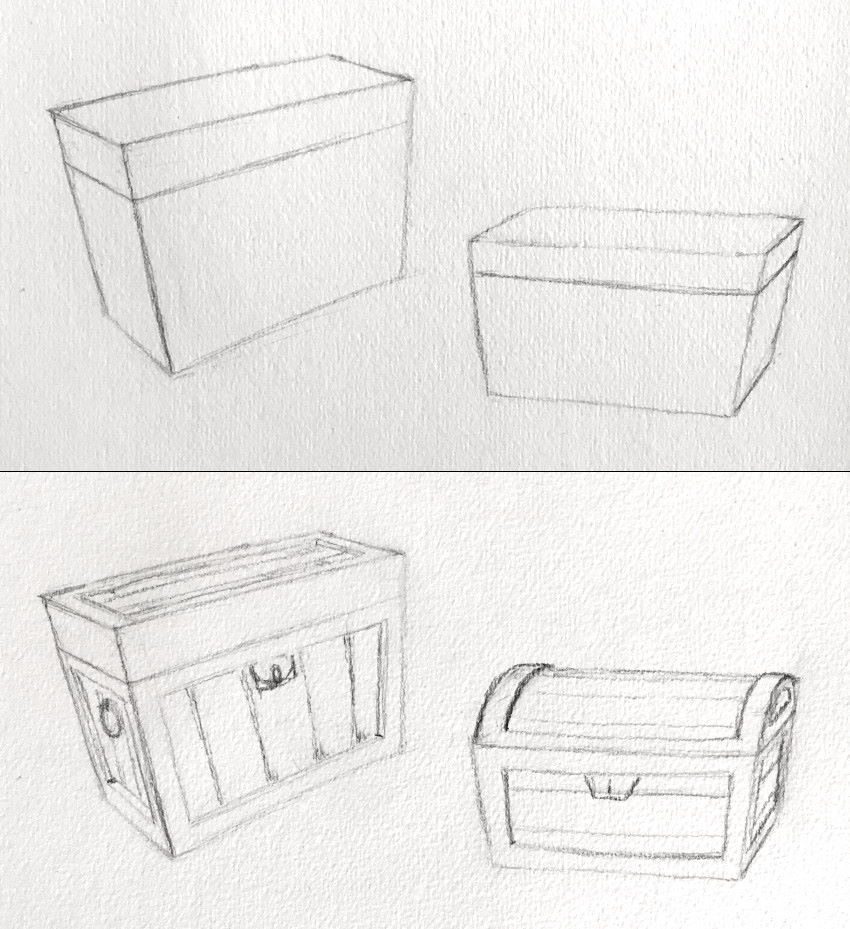
Later, I will demonstrate how to render your drawings.
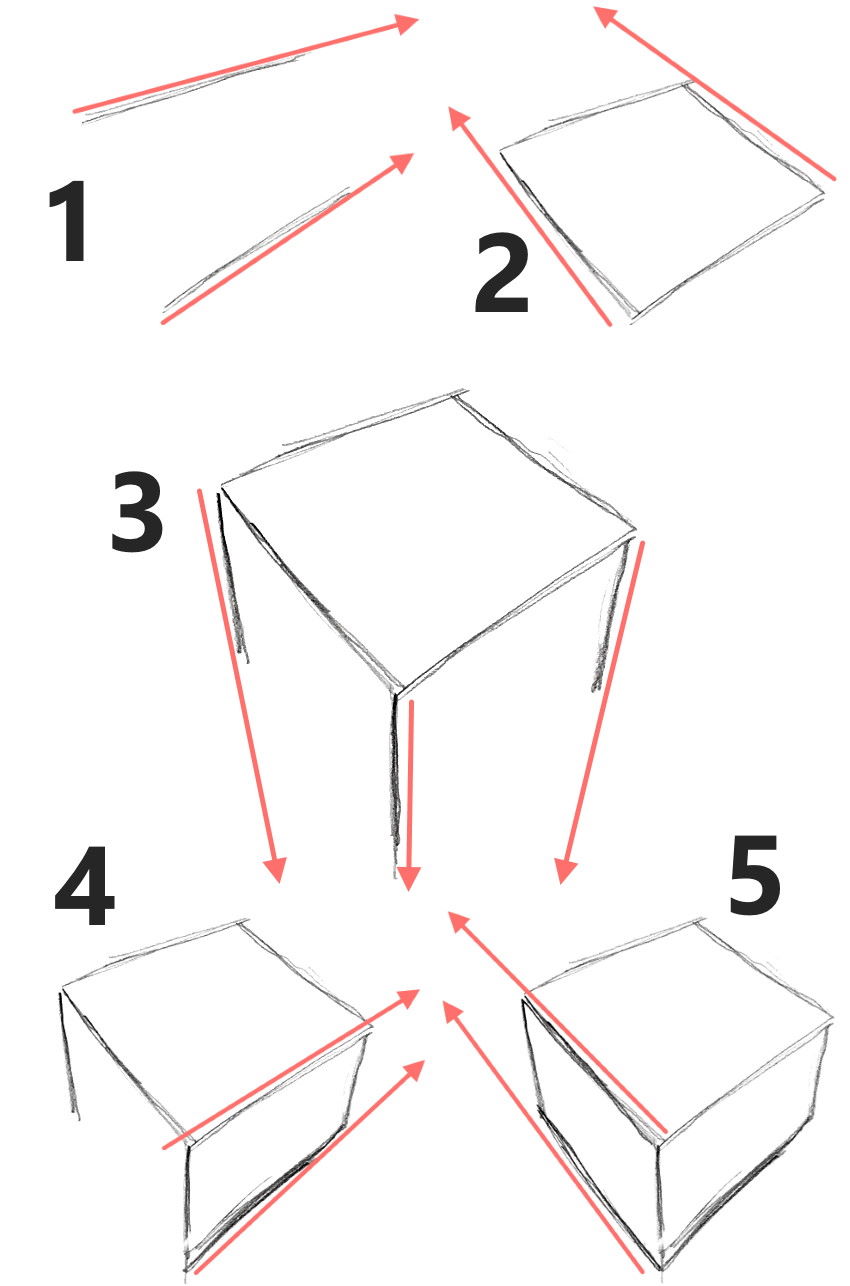
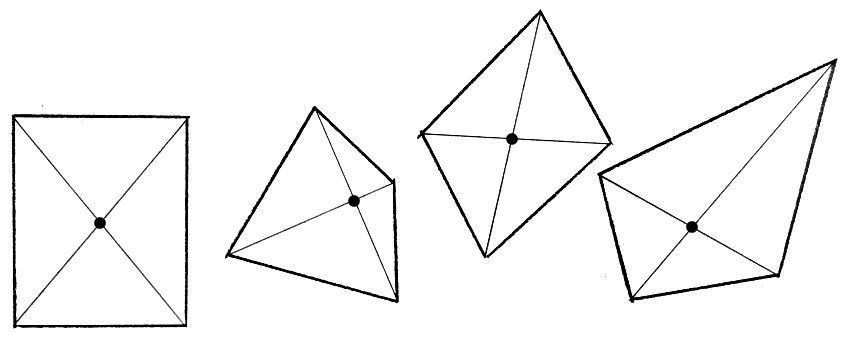
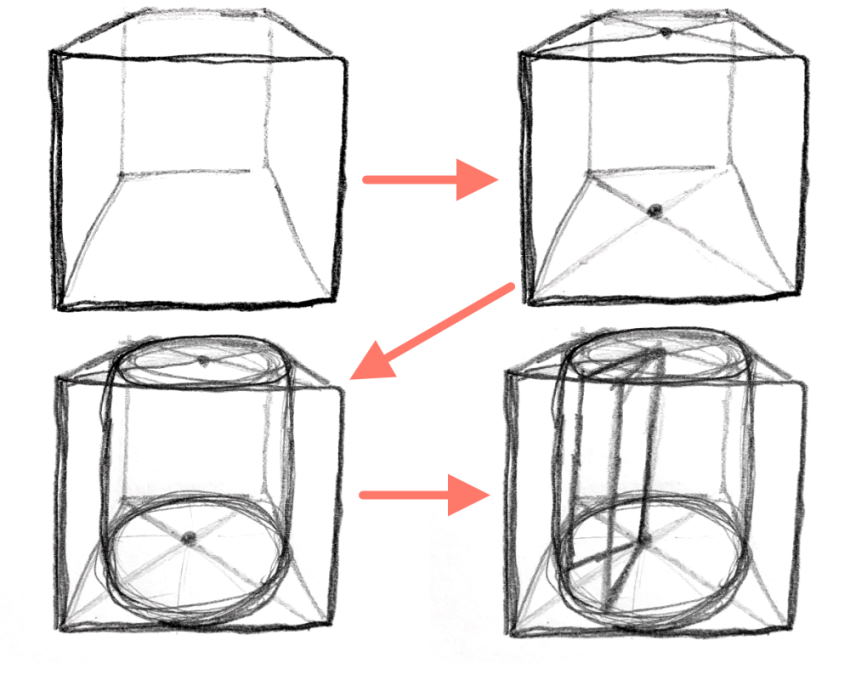
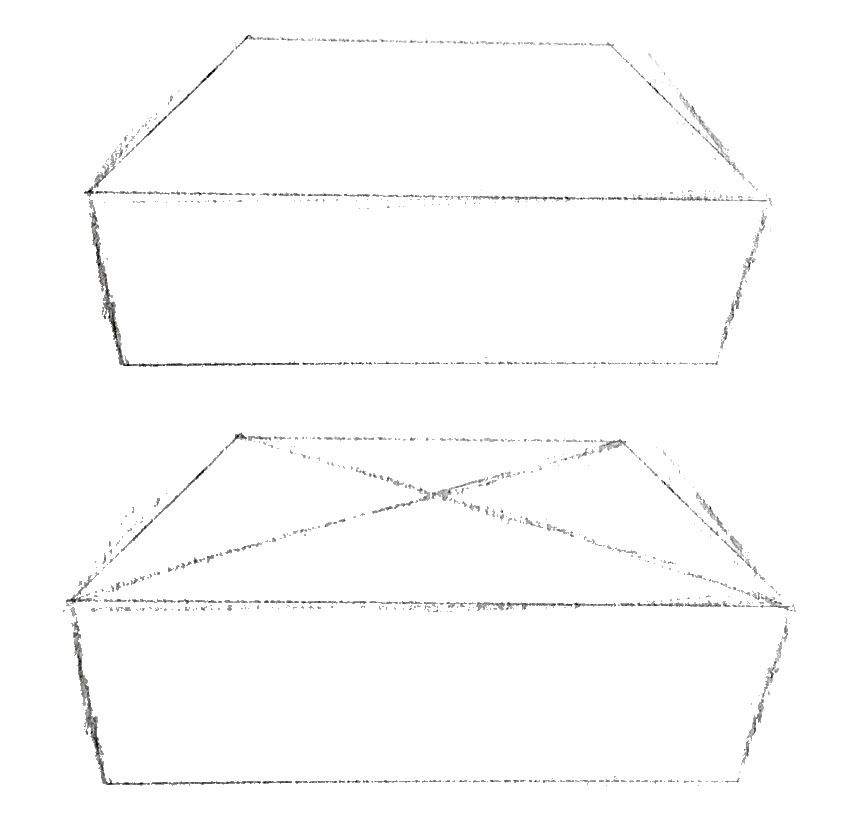
A very helpful thing to know is finding the center of a rectangle in perspective.
To do that, draw two diagonals from the corners of a rectangle.
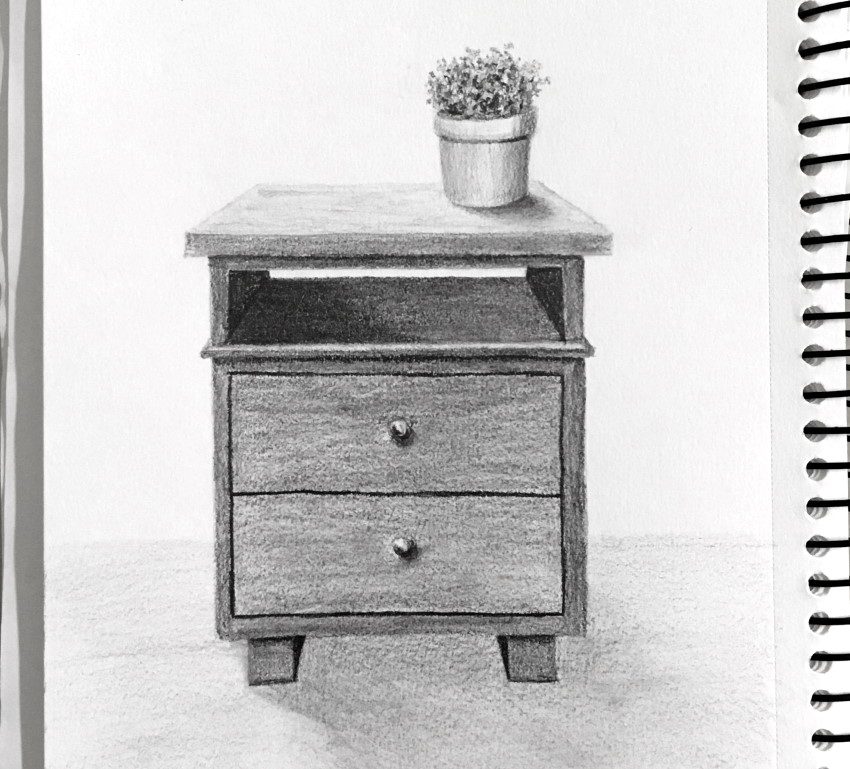
Use this knowledge to draw a nightstand.
Start by drawing a box and find the center for one plane.
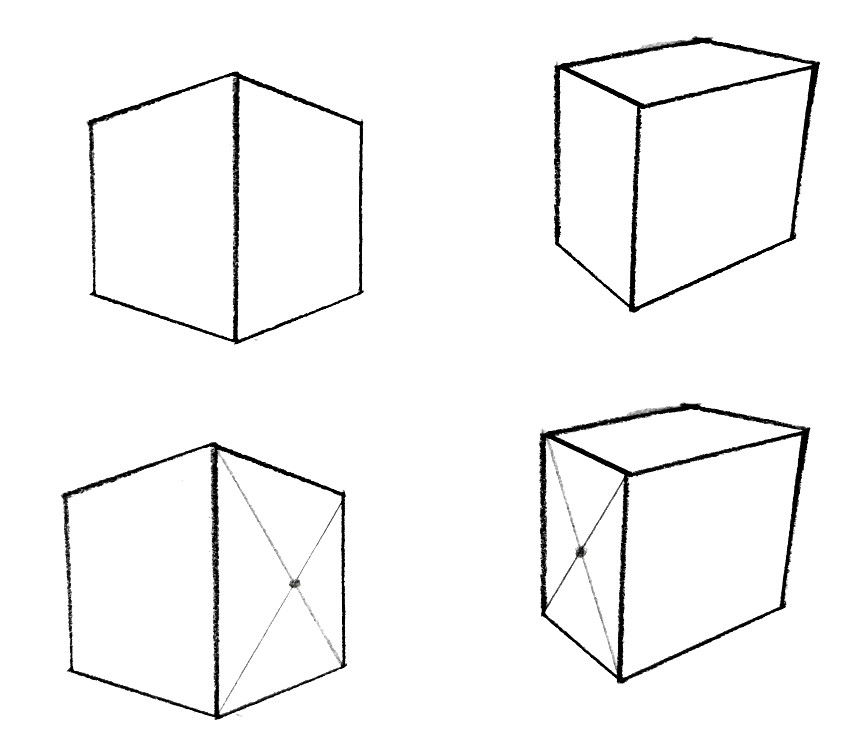
Use the center point to add a line (in perspective) to create two drawers.
Use the same center point to find the position for the handles.
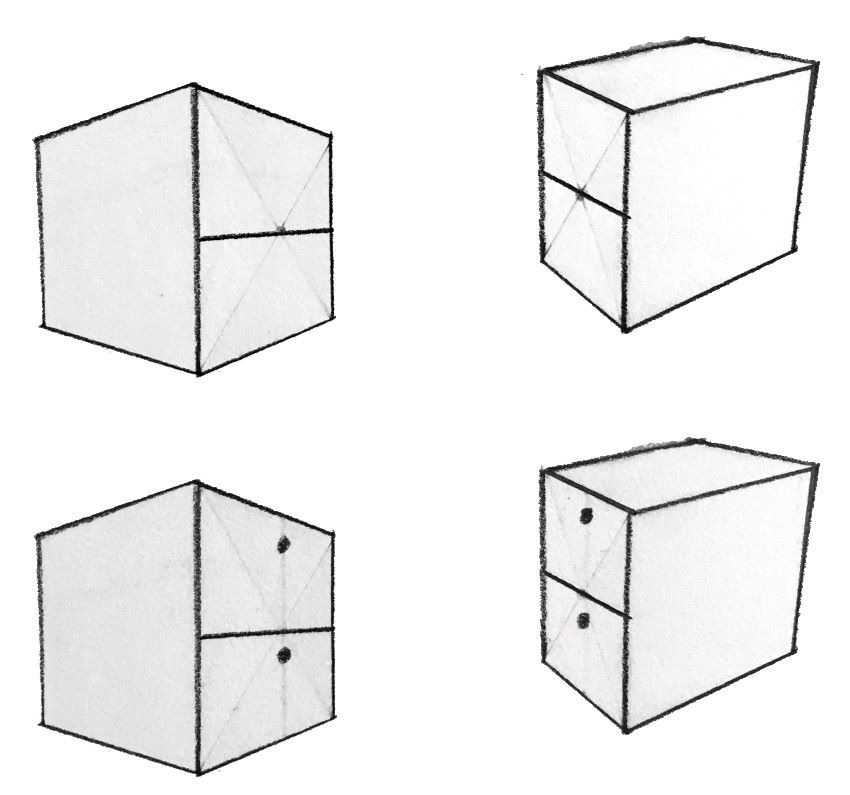
Now you can design your own nightstands (or other box-shaped objects).
To see the supply and equipment I use for drawing, visit my guide for drawing materials.
Important:
When drawing from imagination, I rarely use vanishing points.
Learning linear perspective is important to understand how to draw objects in perspective from different angles.
With some practice, it is possible to estimate where the vanishing points are.
With more practice and experience, it becomes natural to draw anything from any angle.
Remember:
There are two main rules for linear perspective.
1. The farther an object is, the smaller it looks.
2. Objects are subject to foreshortening.
Foreshortening
Foreshortening, sometimes called "artist's nightmare," is not that scary.
It is the way you see things that are along your line of sight. Meaning, continuous.
When the top part of a box is in front of you, you see it as a rectangle with right angles (90 degrees).
When you rotate the box, its top part starts to be along your line of sight and therefore becomes shorter:
The more a plane is along your line of sight, the more it is foreshortened.
If you rotate a box sideways, one plane starts to get shorter, while the other becomes less foreshortened.
When drawing from observation, it is best to draw what you see and NOT what you know.
With time (meaning, with practice and knowledge), you can reverse the process and draw what you know (draw from imagination).
You know that a table might have a rectangle top, but you also know the two rules of perspective:
1. Things get smaller the farther away they are.
2. Objects are subject to foreshortening.
You can apply these rules to your table in perspective:
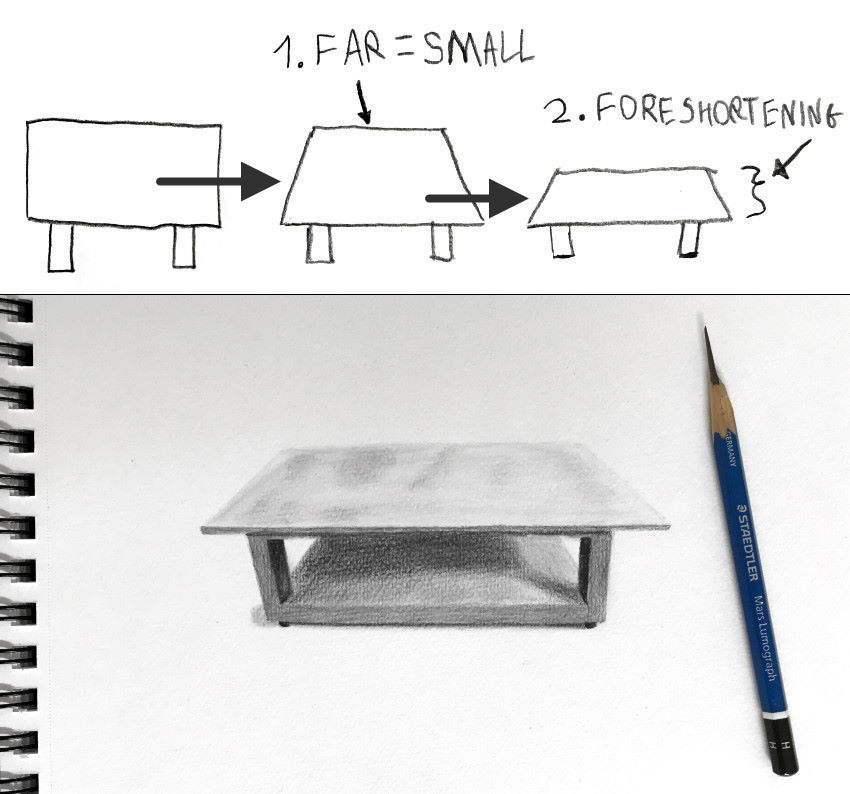
Now you can draw boxes and planes in perspective, considering foreshortening.
The same works for ellipses.
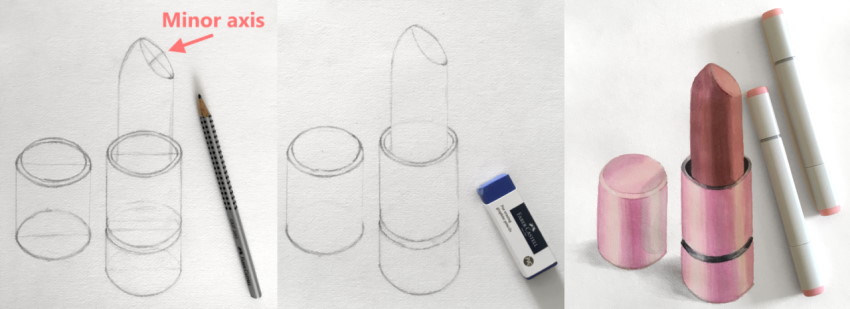
Ellipses
An ellipse (in perspective) is a foreshortened circle.
It has a major axis (long axis) and a minor axis (short axis).
The major axis and minor axis are perpendicular to one another.
Both sides of an ellipse along the major axis are equal.
The same goes for both sides along the minor axis.
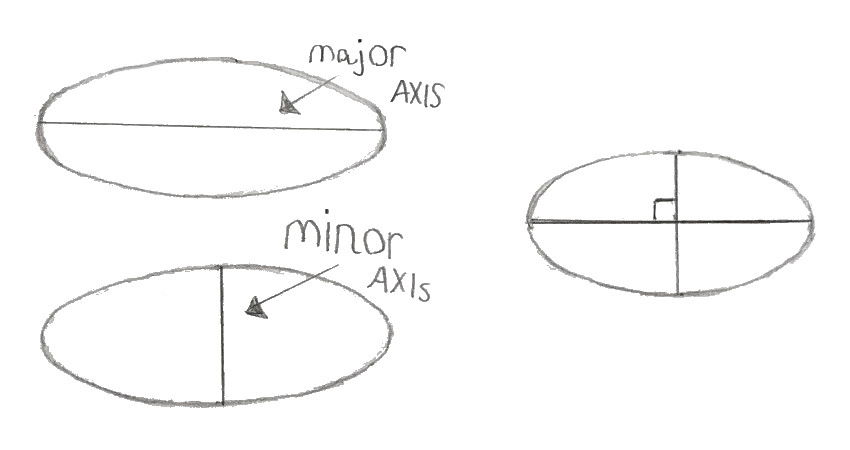
The minor axis shows the amount of foreshortening.
In addition, the minor axis determines the direction of foreshortening.
In other words, the direction of a cylinder.
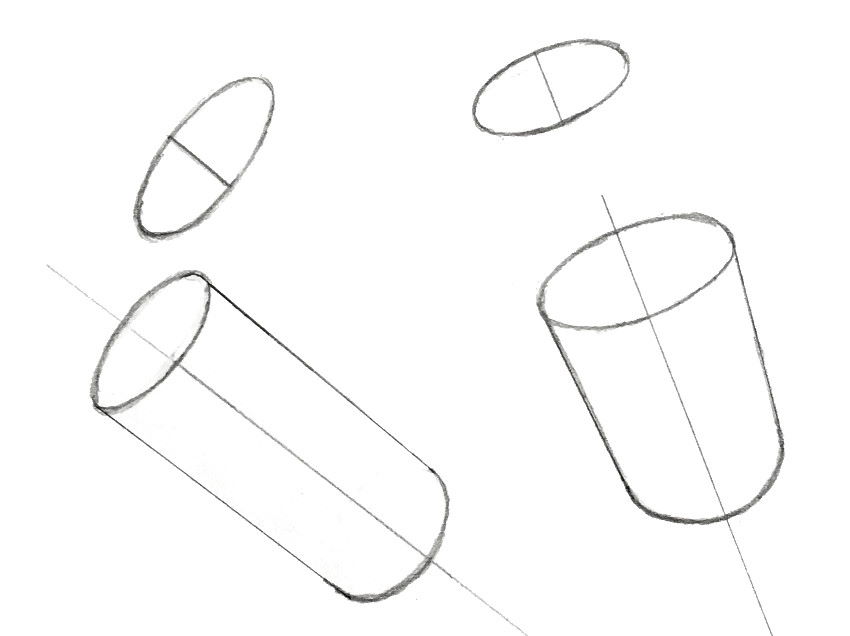
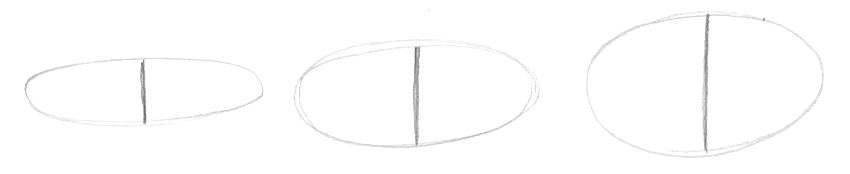
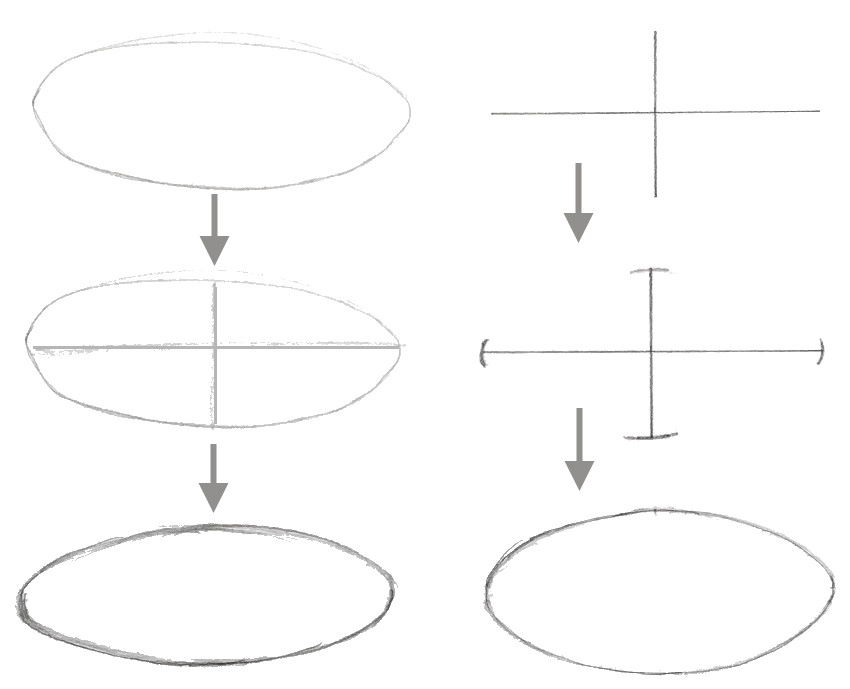
It is a good practice to draw ellipses freehand.
If you struggle with drawing a perfect ellipse, draw a major axis and a minor axis inside your ellipse and correct it.
Alternatively, draw the axes first. Then, add some rounded indication to the axes. Lastly, connect the lines.
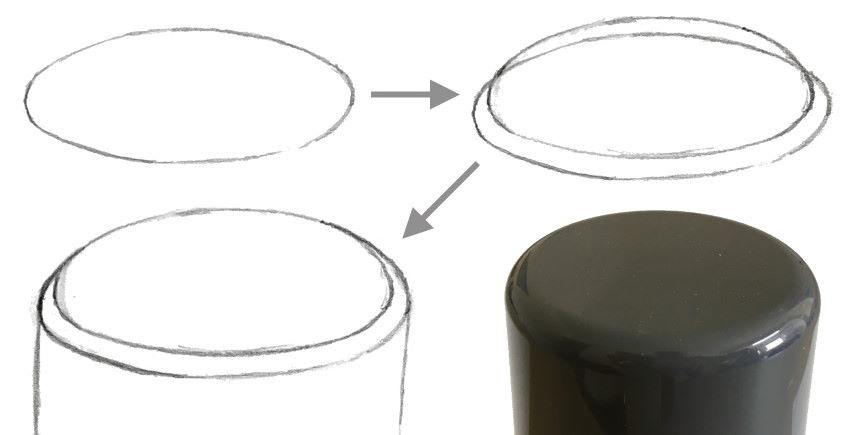
For a rounded elliptical edge, draw a smaller ellipse (in diameter), and place it a bit higher in the direction of the minor axis.
Connect the two ellipses and erase the overlapping part (which should be hidden).
For an elevated ellipse, draw an inner (smaller) ellipse.
Then, raise two lines and draw an ellipse (draw a cylinder).
Finally, erase overlapping marks.
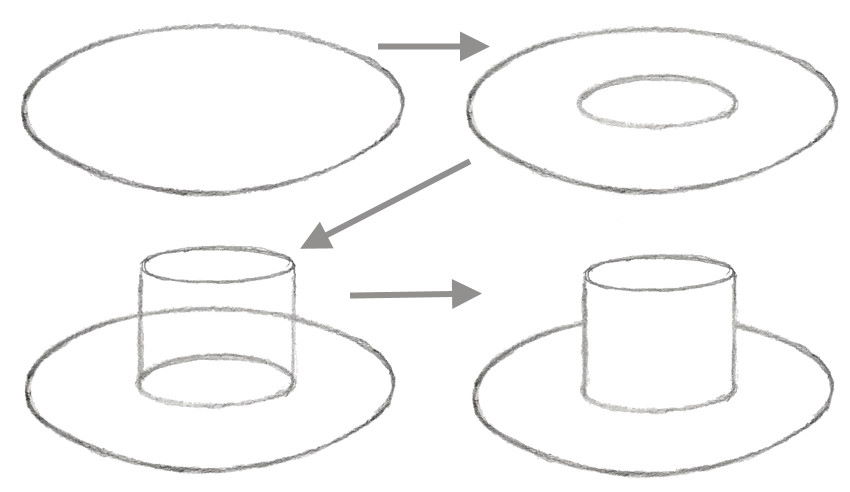
For a lowered (sunken) ellipse, draw an inner ellipse.
Then, draw a lower ellipse and erase overlapping parts.
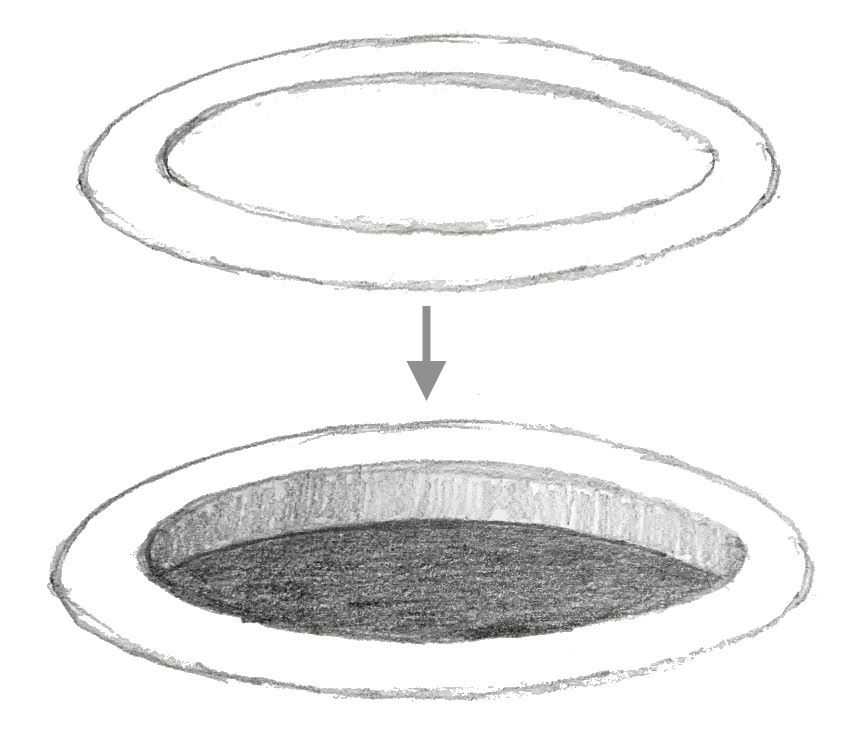
When you want to draw elevated or sunken ellipses, there is one more thing to consider.
From the first rule of perspective (objects or planes look smaller when they are far away), you need to draw the far part of an ellipse smaller.
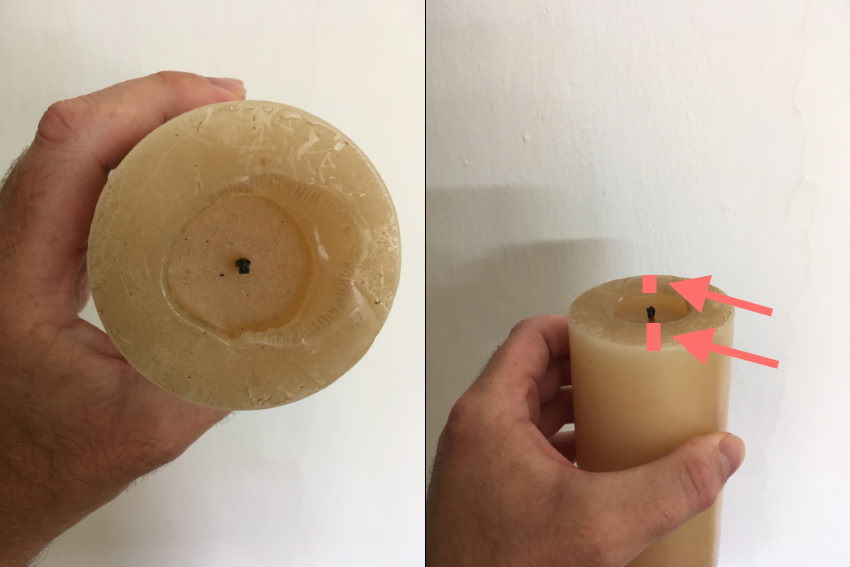
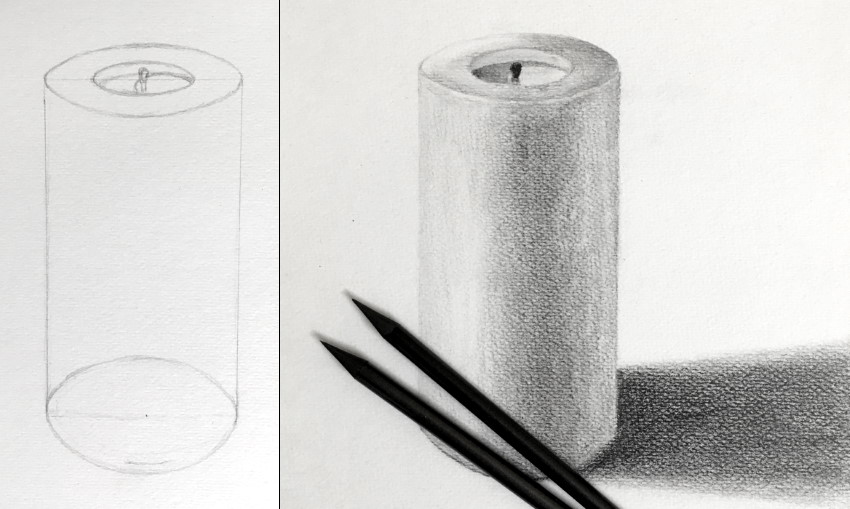
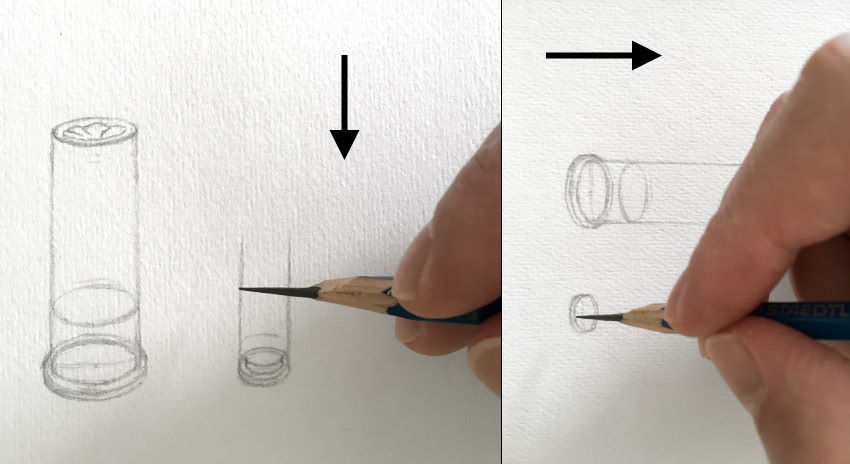
To draw a candle (or anything with a cylindrical body), you need to understand cylinders.
I will cover that next.
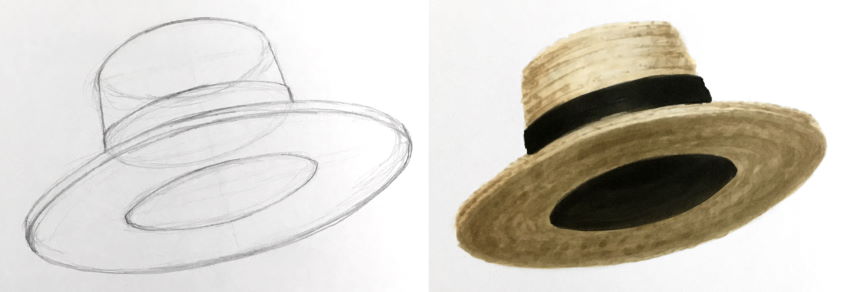
Use the knowledge you have on ellipses to draw some hats from imagination (or memory).
Cylinders
The top and bottom parts of a cylinder are circles (or ellipses when foreshortened).
From the first rule of perspective, you know that objects look smaller as they are farther away.
Yet they keep the ratio between height and width (there is no distortion).
The same is true for a cylinder body.
It looks smaller with distance.
From the second rule of perspective, you know that objects are subject to foreshortening.
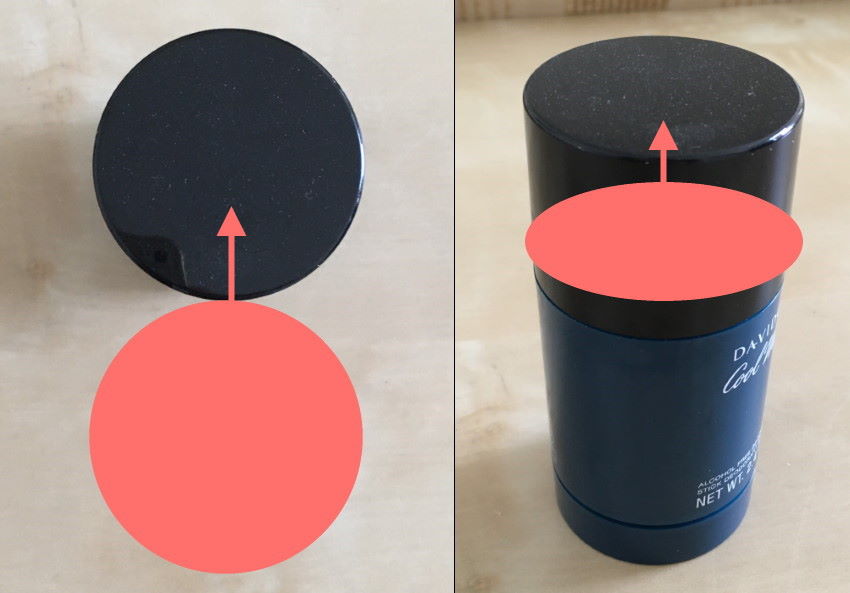
The top part of a cylinder is a circle when in front of you.
When the angle of your sight is changing, the circle starts to be along your line of sight and becomes an ellipse.
The more it is rotated to be along your line of sight, the more it is foreshortened.
Meaning, the distortion between height and width gets stronger.
This is super important because a cylinder has a long body.
A long body means that you see each part of a cylinder from a different angle of sight and therefore with a different degree of foreshortening.
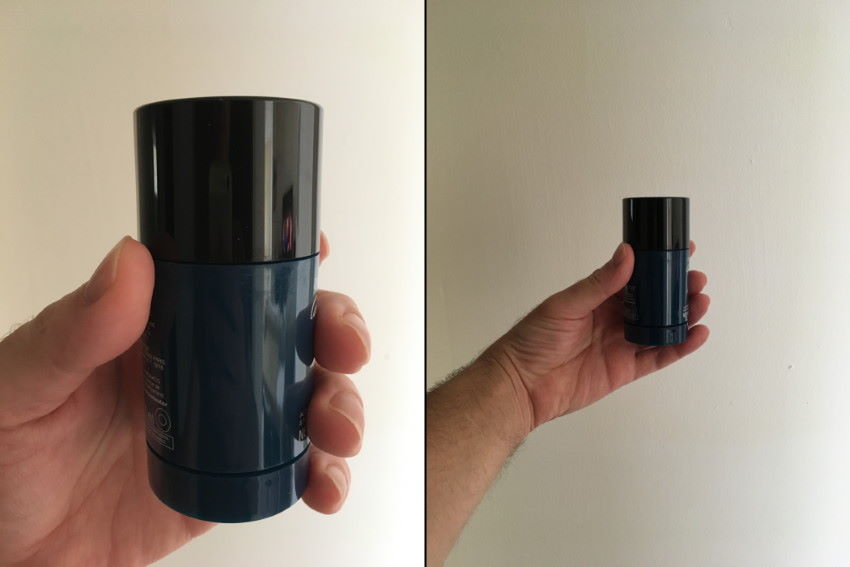
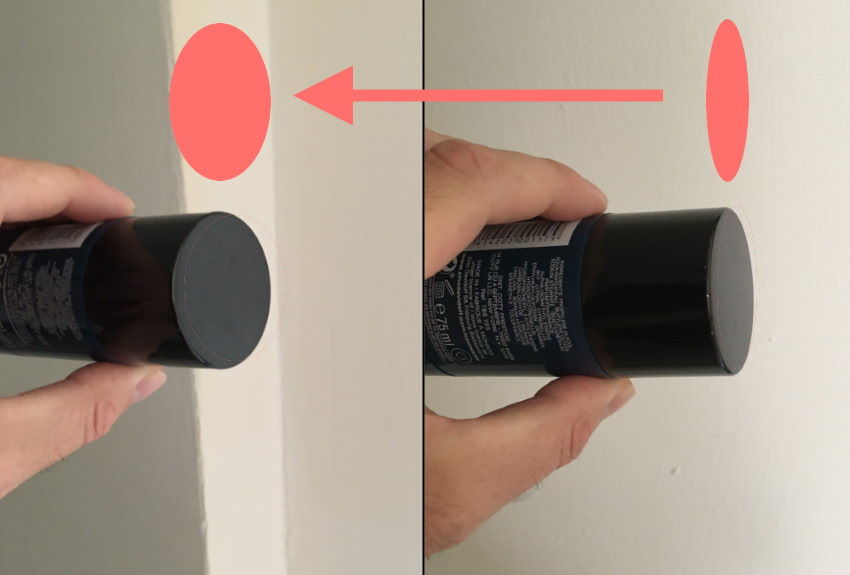
In the next example, a cylinder is moving to the left.
Your angle of sight changes to look at it when it is moving, and its top part becomes less foreshortened.
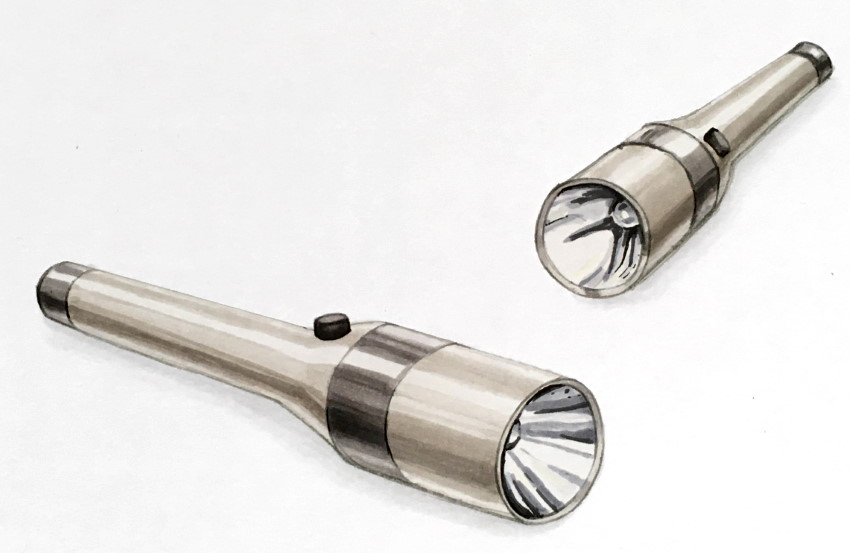
Now that you understand that, you can draw a flashlight (for example) from imagination.
You know that the left side of the flashlight has less foreshortening (as it moves sideways from the vanishing point, which is in front of you).
Consequently, the left ellipse is less foreshortened than the right ellipse.
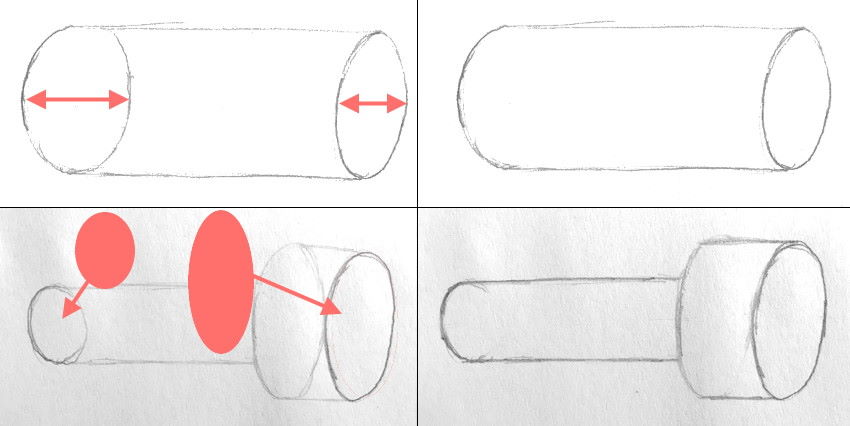
And vice versa when drawing a flashlight with direction to your right side.
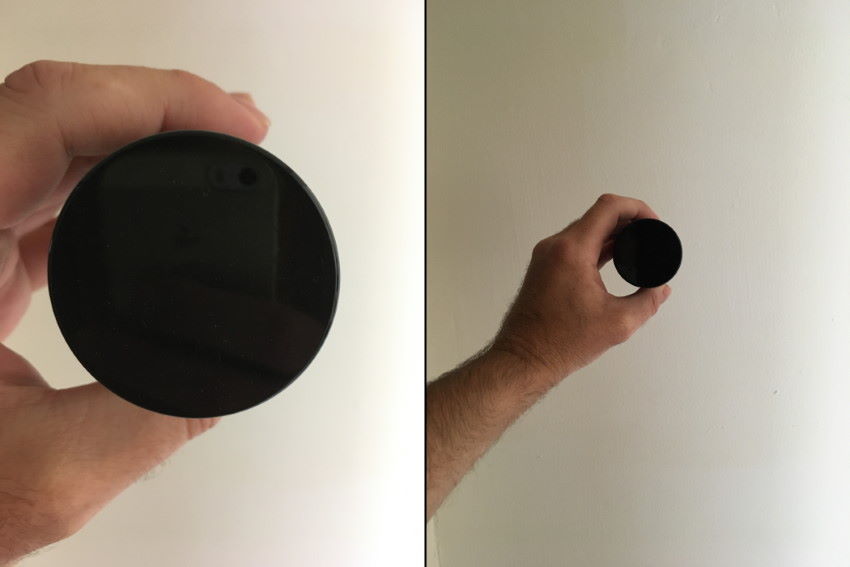
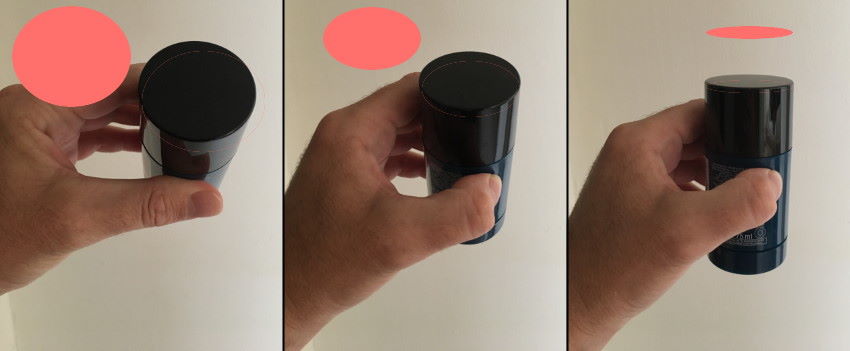
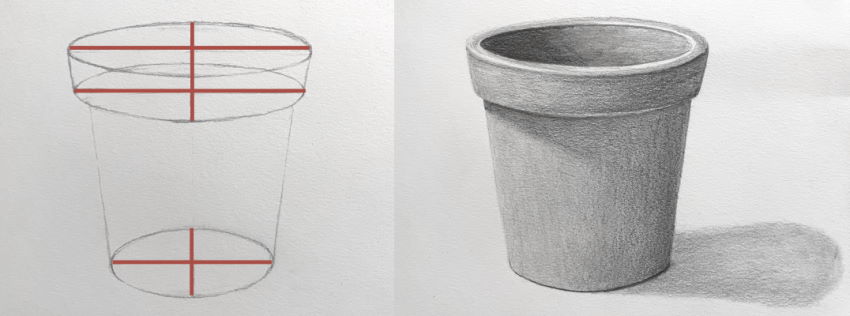
The same phenomenon happens when you lower a cylinder (below the horizon line, which is your eye level when looking forward).
The lower it is, the less it is foreshortened.
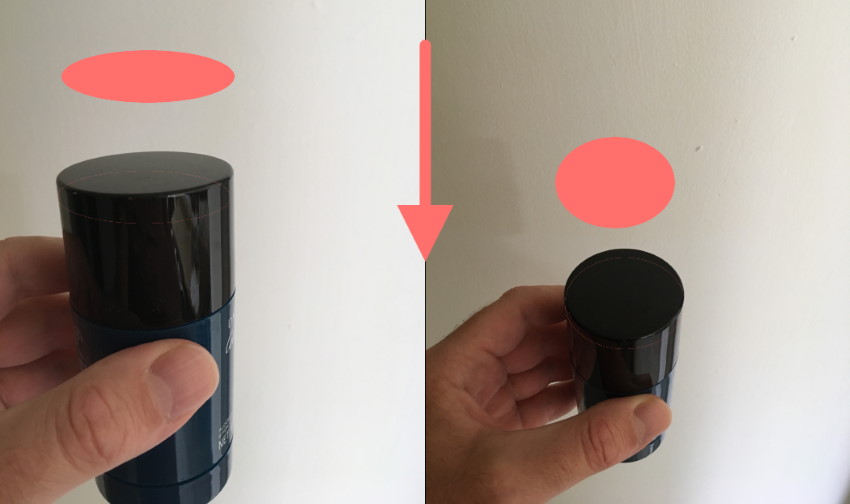
So, ellipses have less foreshortening as they are lowered below the horizon line.
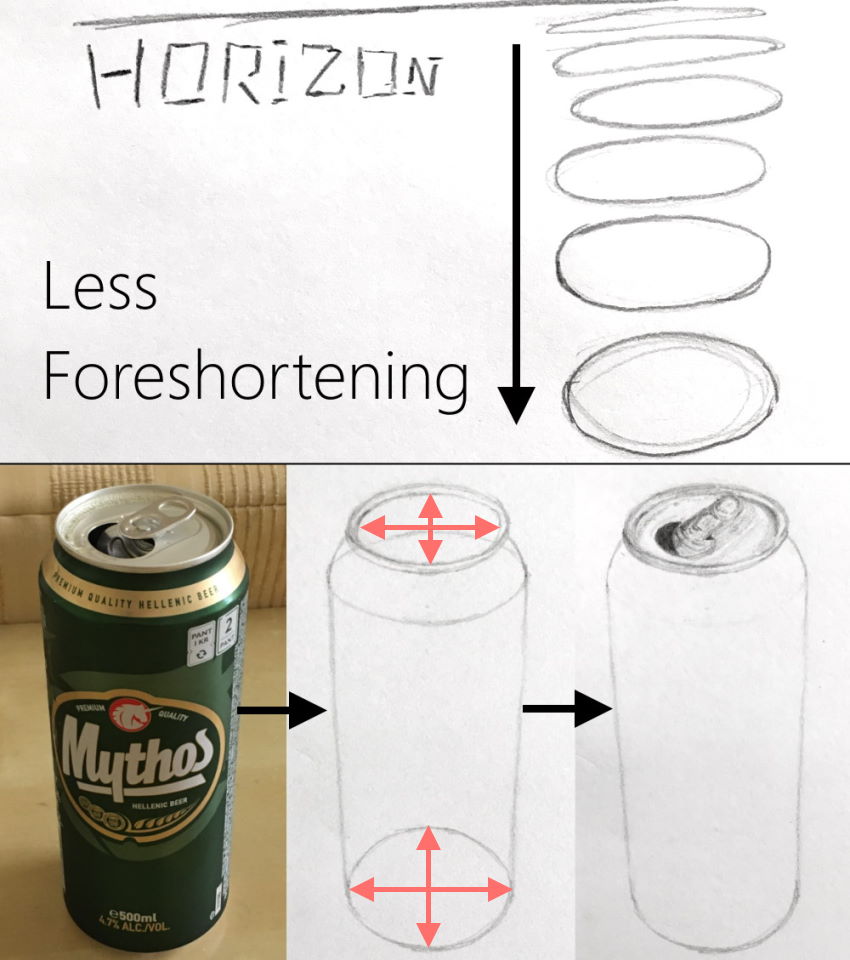
And vice versa, less foreshortening as they are higher above the horizon line.
You can use this knowledge to draw a plant pot (for example):
Remember.
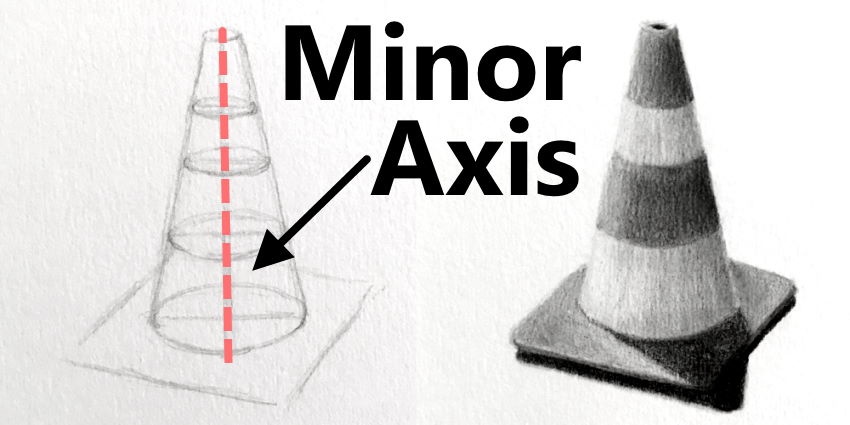
When drawing a cylinder, ALL ellipses share the same minor axis.
Meaning, their foreshortening is in the same direction.
On the other hand, each ellipse has a different amount of foreshortening.
The same works for cones.
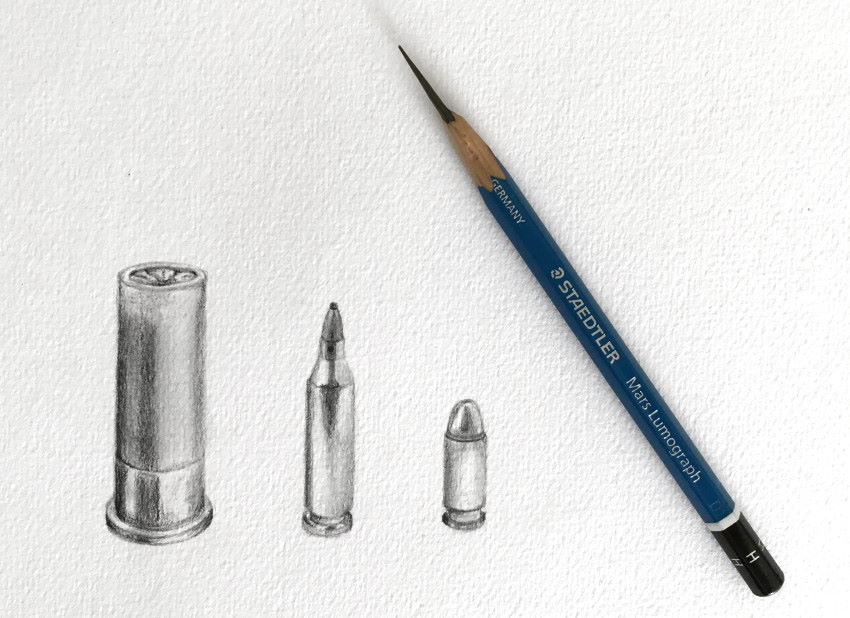
With the combined knowledge of drawing ellipses and cylinders, you can draw anything cylindrical.
You can do it from observation, imagination or memory.
When drawing, rotate your drawing paper in a way that is most comfortable for you.
The last step is rendering.
For more about ellipses, visit my ellipses drawing guide.
Rendering
Rendering is the final outcome.
The first step of drawing is planning. Meaning, choosing a topic and working on composition.
The purpose of composition is to create something interesting.
For more info on composition, read my guide on how to draw a still-life composition.
The second step is designing (sketching and then drawing) and adding details.
The last step is rendering. It is the time to use shading, texture, depth, cast shadow and anything else for your drawing to have the quality of a finished artwork.
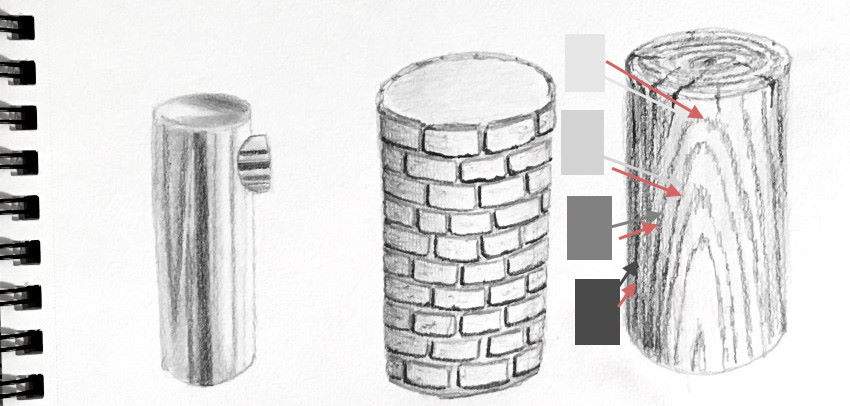
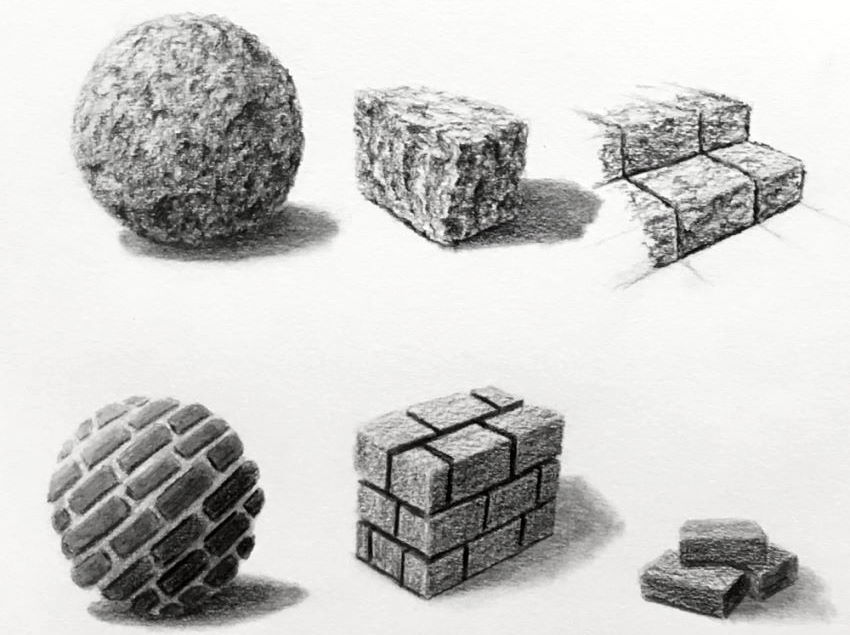
Start by observing some basic materials like wood, metal, chrome, plastic, bricks, leather, etc.
Draw these textures and understand their patterns and relationships with light.
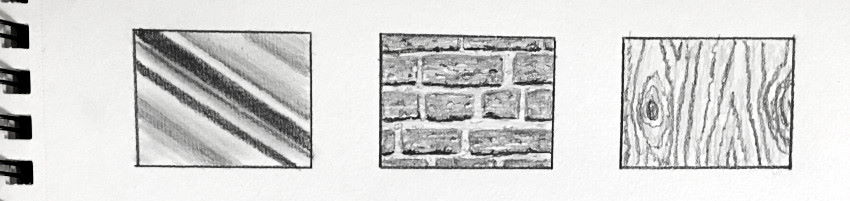
Next, draw them on some basic shapes like a cylinder, box and sphere.
This practice gives you the confidence to draw basic textures for your concept art and product design.
Important:
When drawing, decide where the light is coming from and create a transition (gradient) from dark to light.
Remember that dark values are darker in dark areas (and lighter in light areas), and light values are lighter in light areas (and darker in dark areas).
In the example below, the wood deck has a certain value (1).
When you add cast shadow (2), the value in the shadow area is darker (and has soft edges).
But, not just the overall value is darker (in the shadow area). The areas between the wood plates (3), which are called ambient occlusion (because scattered light cannot reach these areas), are darker too in the shadow area.
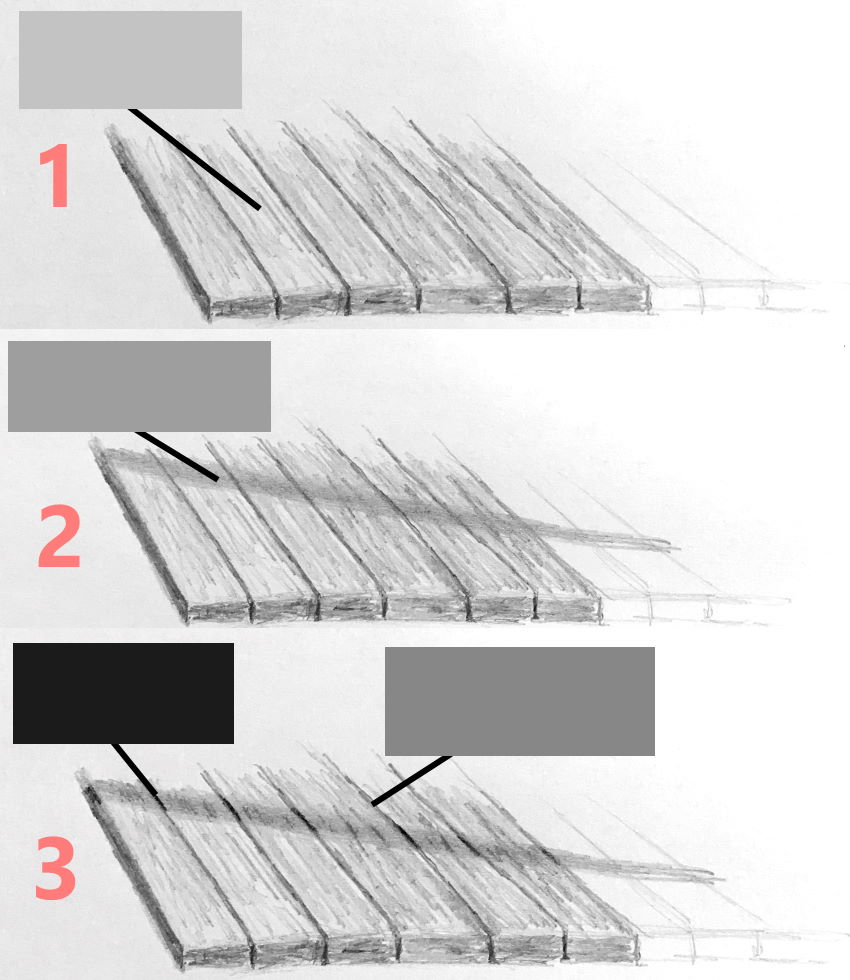
In the next example, look how the wood pattern becomes darker in the shadow area.
You can use different mediums to present (render) your artworks.
Any medium (oil paint, watercolor, gouache, colored pencils, acrylics, etc.) is acceptable. It is a matter of personal preference.
Here is an example with markers.
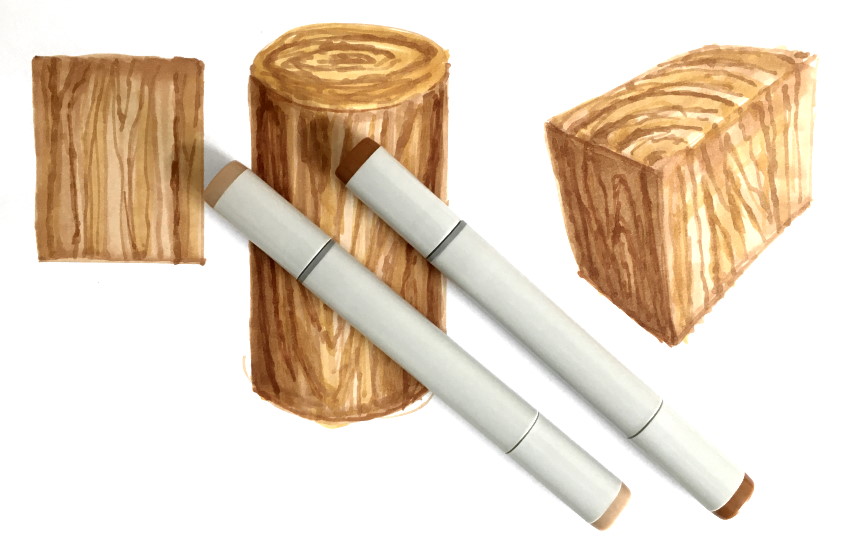
For recommended markers, visit my guide on markers for drawing.
Rendering with markers:
Rendering with pen and ink is a quick way to present your design.
Here is my list of recommended drawing pens.
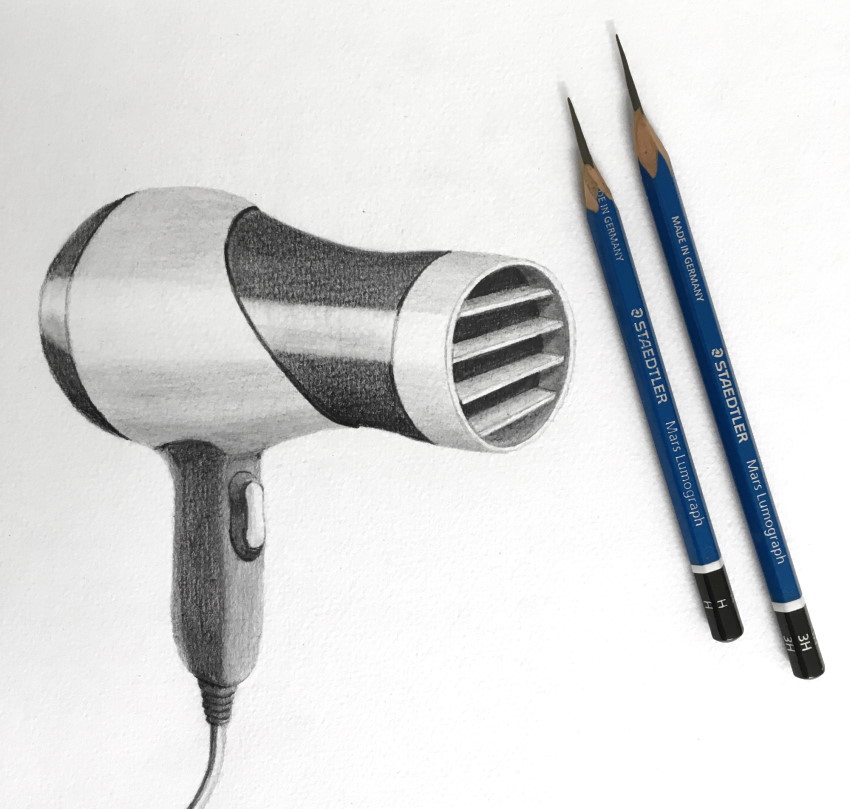
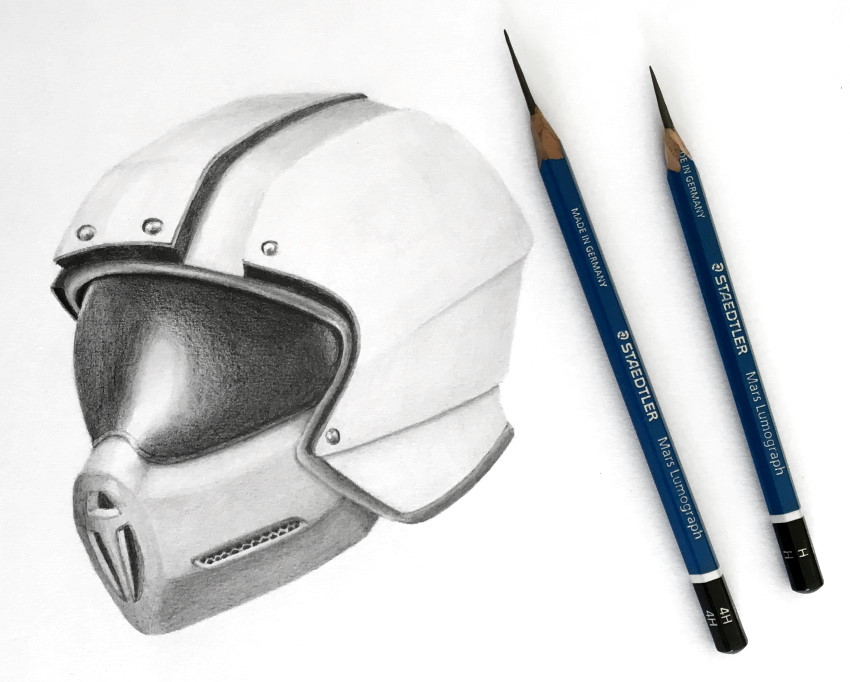
My favorite render style is realism. With pencils (in this case) or with any medium.
Remember, there are no lines in nature and therefore no lines when drawing realism.
If you are unfamiliar with realism, visit my guide on how to draw realism.

Here I used markers as a base layer and colored pencils for the details.
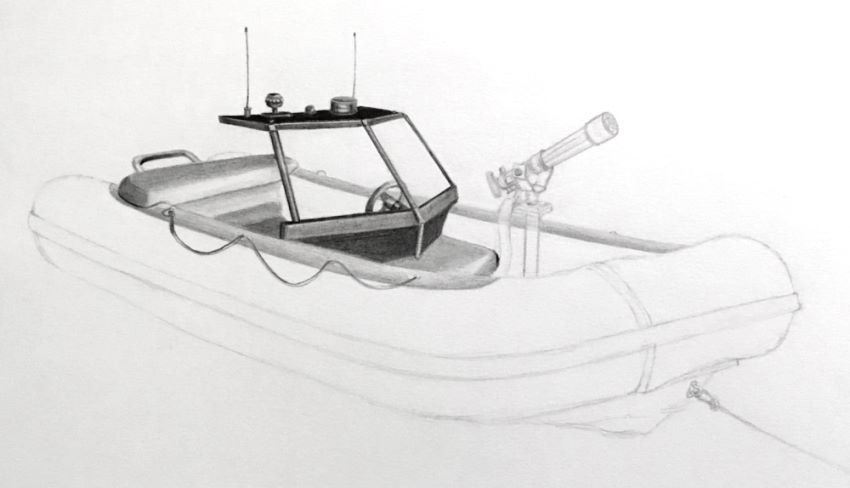
You can combine drawing from observation and drawing from imagination.
In the next example, I looked at an image of a boat as an idea for its body.
The rest I added from imagination.

I draw from top to bottom and left to right (I am right-handed), so not to smudge what I have already drawn.
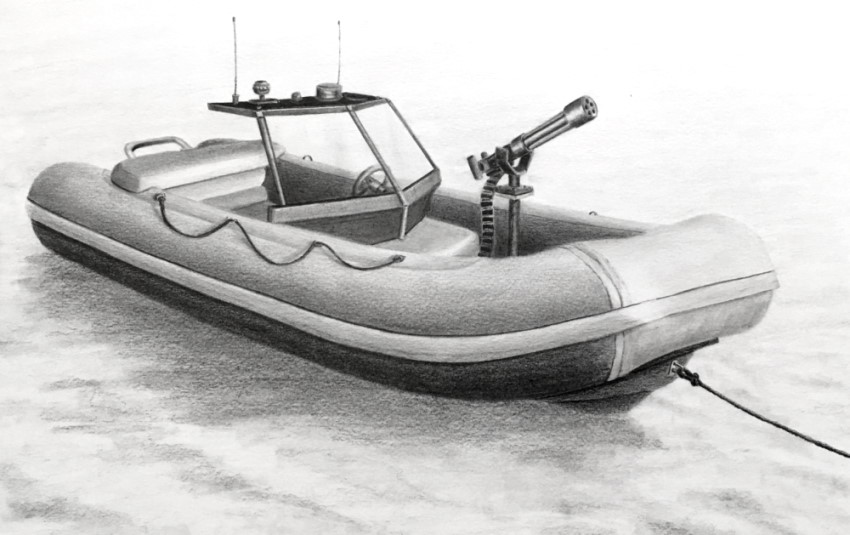
When rendering, think of the light source and the materials.
For shiny materials, like some metals, use strong contrast between dark and light values.
A zodiac boat is a complex shape.
It shares the characteristics of a torus shape.
To learn how to draw complex shapes, visit my torus drawing guide.
Spheres
Spheres are easy to draw. On paper (2D), their outline is a circle.
To change a circle to a sphere, draw some lines, which translate as both (the illusion of) depth and direction.
These lines are called cross contour.
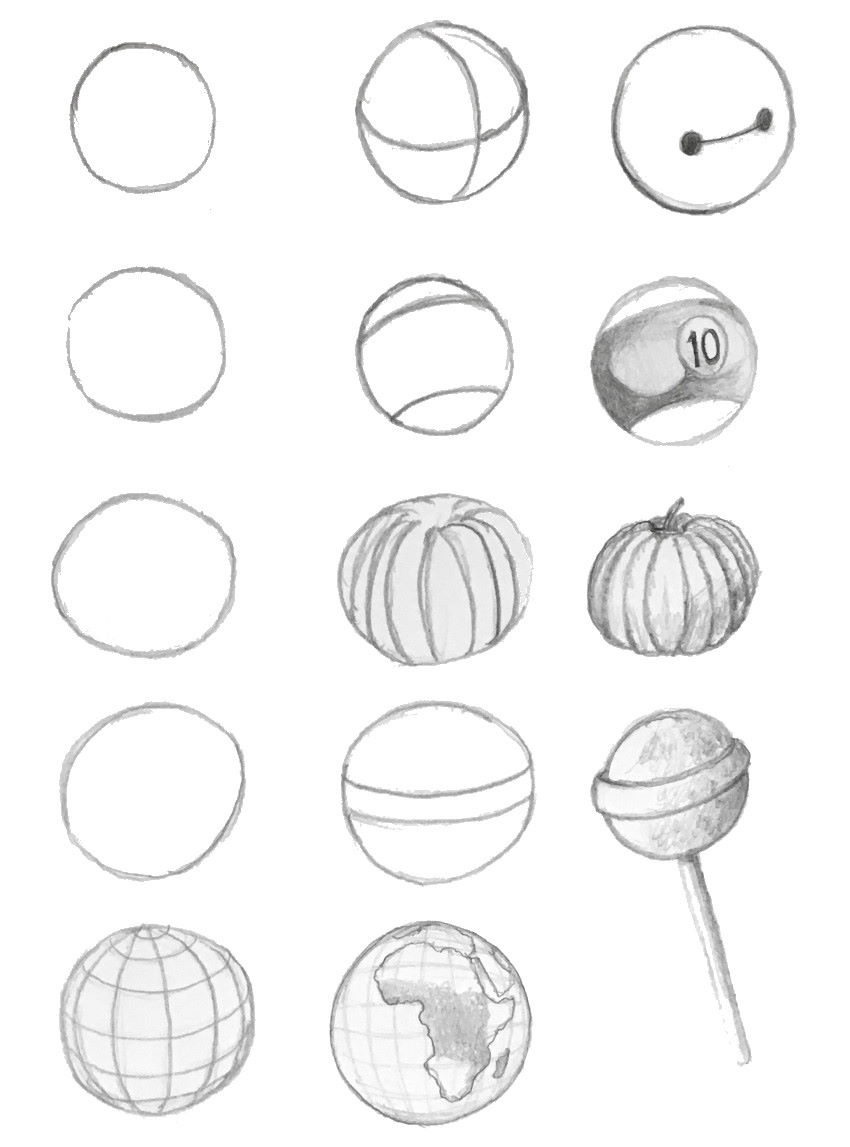
When looking at a sphere, the middle of it is in front of you.
The parts of a sphere that are closer to the edge are starting to be along your line of sight and therefore foreshortened!
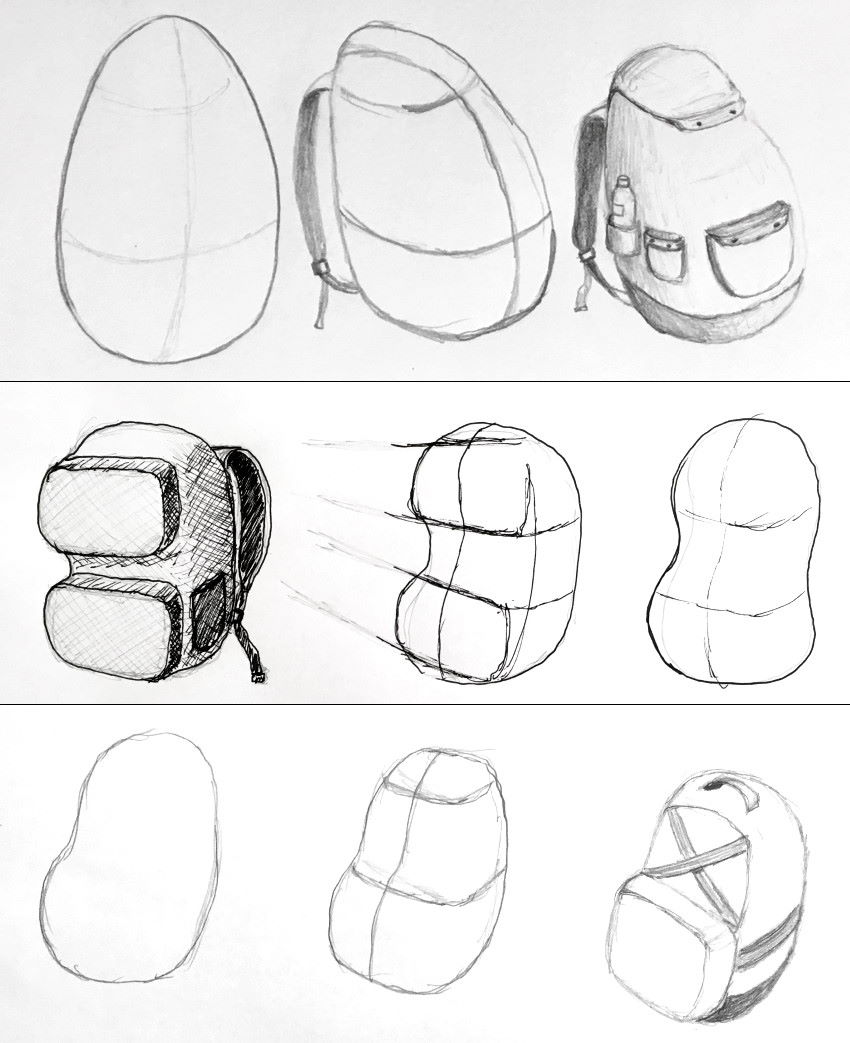
What works for a sphere (circle) also works for other "spherical" shapes like an egg, ellipses or a peanut.
By adding a couple of lines, it is easy to give it depth and direction (with consideration to perspective).
Sketches are meant to be quick.
The more you practice with quick sketches, the more natural the drawing process becomes, making it easier to focus on a design.
Once you are happy with a design, you can render it.

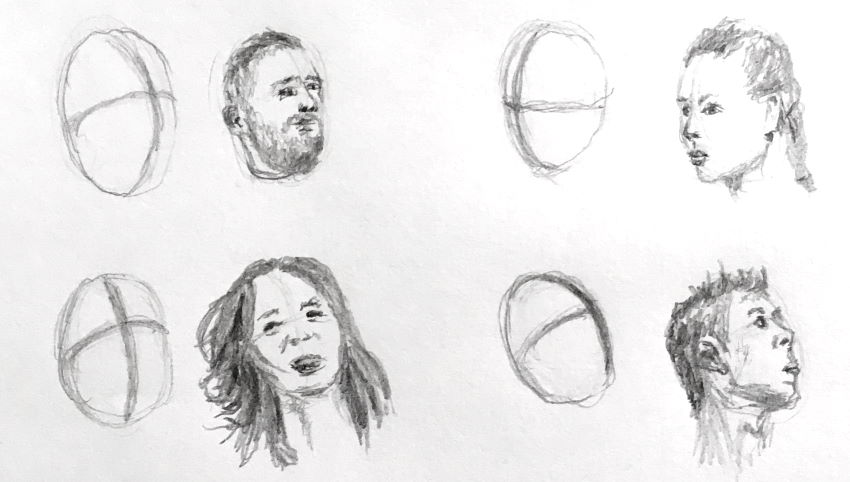
You can use cross-contour lines for drawing organic objects, like the human head.
And, the human body.
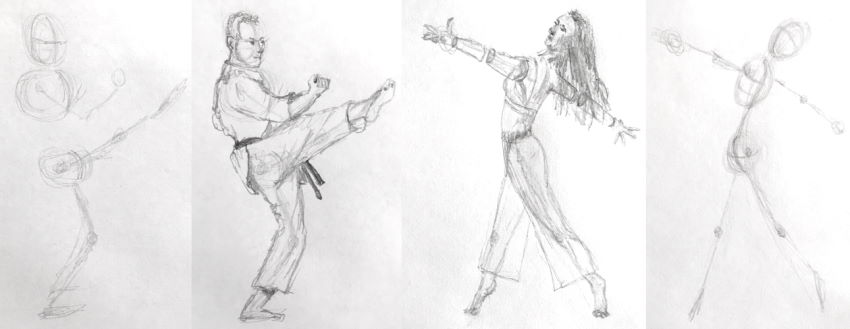
With practice (and more practice), you can draw characters in motion and action.
Cross-contour, foreshortening and perspective are key for success.
Here is another example of how I render from top to bottom and from left to right.

Contrast in brightness values helps your drawing be more noticeable.
You can use atmospheric perspective and other types of contrast (like soft vs. hard edges, rough vs. smooth texture, etc.) to enhance your render.

For more on spheres, visit my ball drawing guide.
Concept Art
Concept art is the process of creating new and unique ideas.
Together with a good story or theme, concept art is the basis for the video game industry.
Some genres in the film industry (like fantasy and science fiction) rely heavily on concept art, and so do comics and animation.
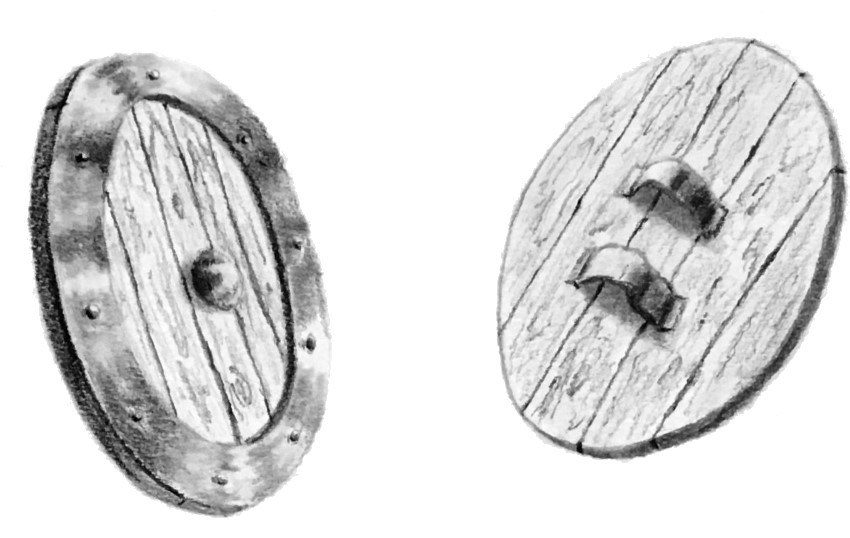
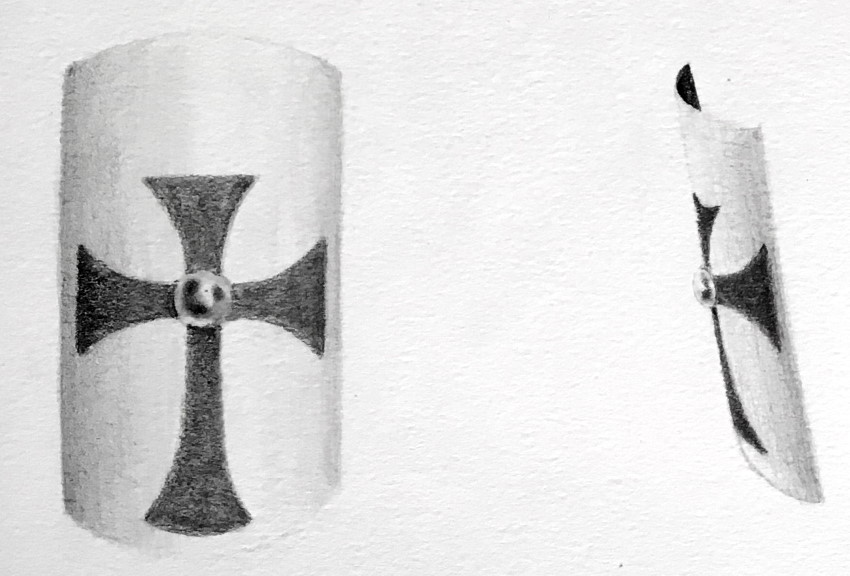
Arguably, the easiest shape to start with is a round plane (circle).
Draw some round items in perspective (ellipses with different degrees of foreshortening and direction, which are determined by the minor axis).
It can be a plate, Frisbee, button or shield for a fantasy computer game.
The next shape to practice on, is a rectangle in perspective.
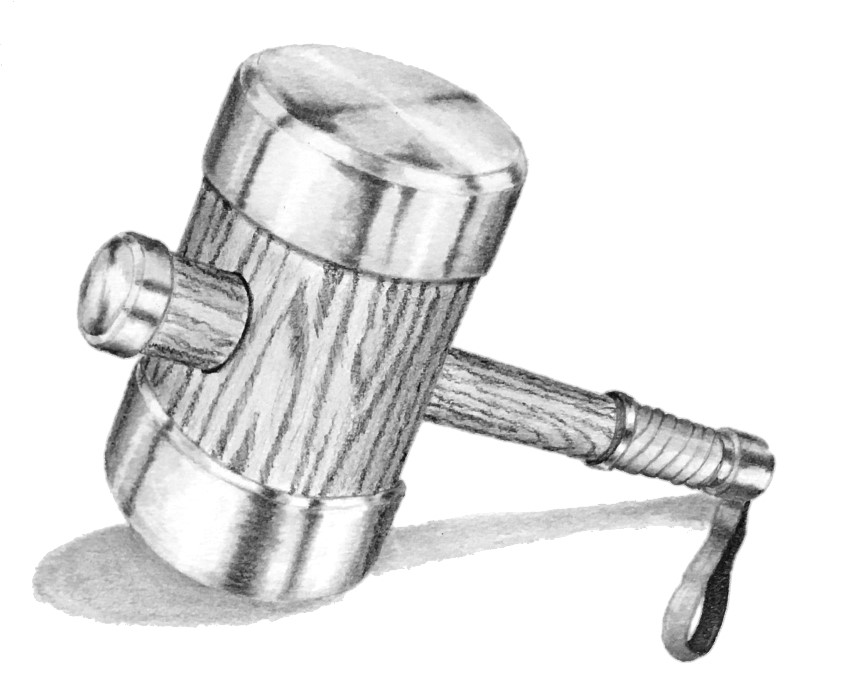
Once you are comfortable drawing circles and rectangles in perspective, try some cylinders.
Remember:
Use the minor axis to determine the direction of a cylinder, and pay attention to foreshortening.
Render your artworks with texture.
For a deeper understanding of textures, like wood and metal, visit my texture drawing guide.

A circle fits perfectly inside a square.
Consequently, the center of a square is also the center of a circle.
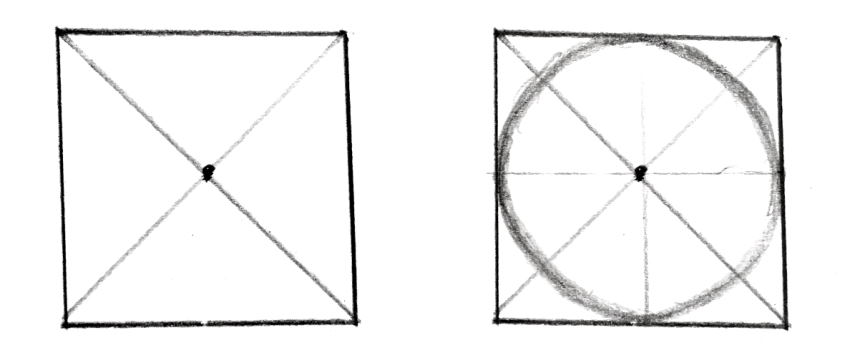
It is also true in perspective.
To find the center of ellipses in different amounts of foreshortening, draw a cylinder inside a box.
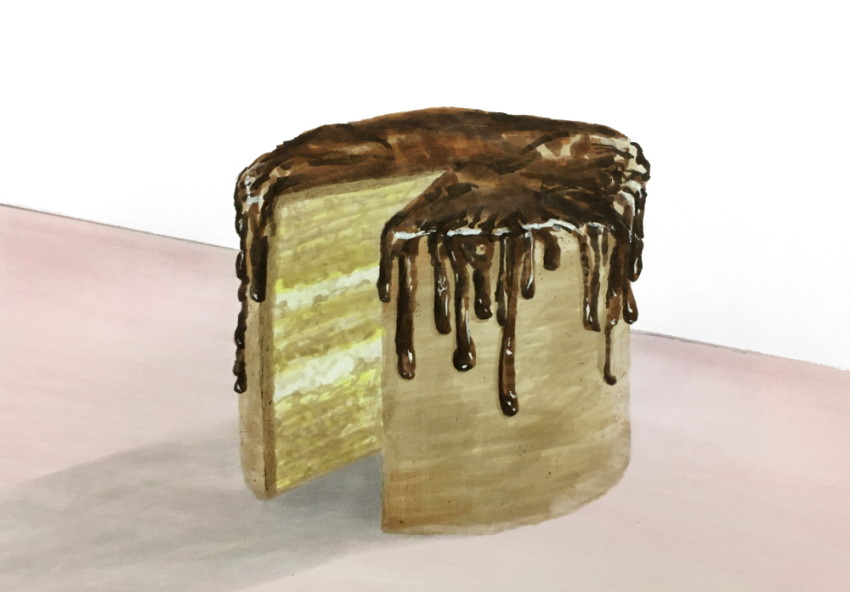
Now you can draw cakes from your imagination.
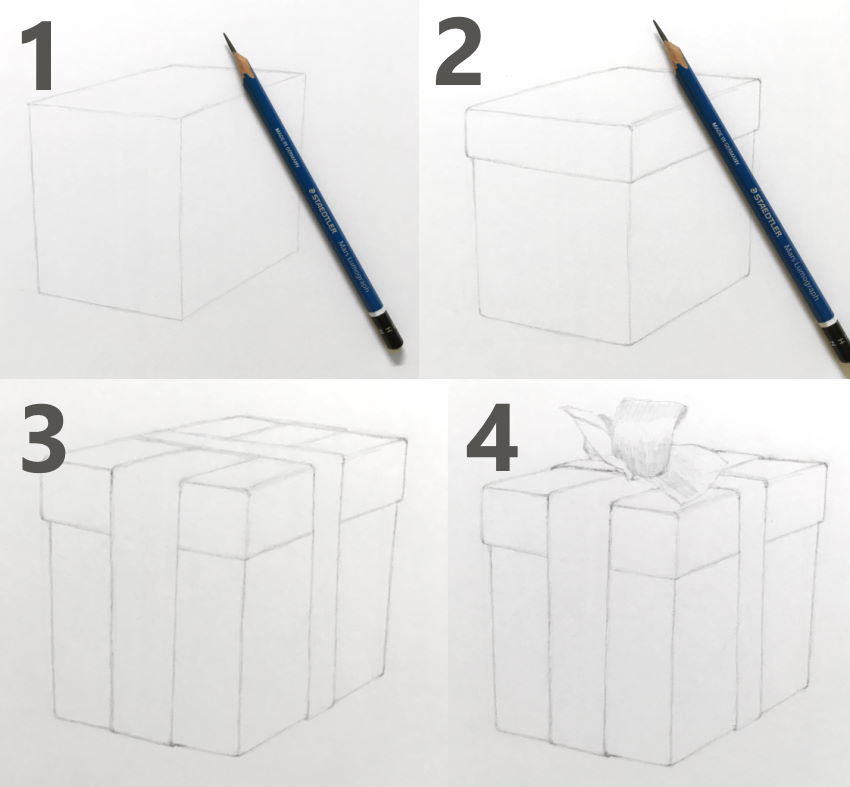
Lastly, introduce boxes.
You can use linear perspective techniques, like divide or multiply, to place a ribbon in the center of each plane.
When it is time to render, feel free to use mixed media.
Meaning to use more than one medium.
In this case, I used markers to draw a box (from imagination) and added a person with pencils (from observation).

How to draw wheels:
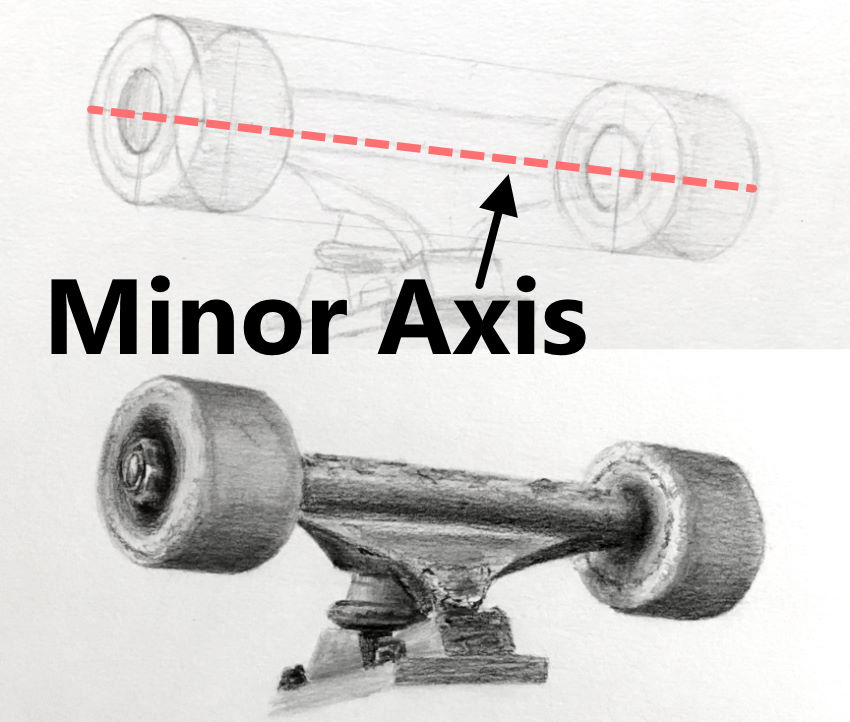
Wheels are a set of ellipses (foreshortened circles).
In a car, carriage, wagon and other vehicles, the two front wheels (and the two back wheels) form a cylinder.
The minor axis for the wheels is determined by the vanishing point.
Therefore, the front and back wheels have different directions (and amounts of foreshortening).
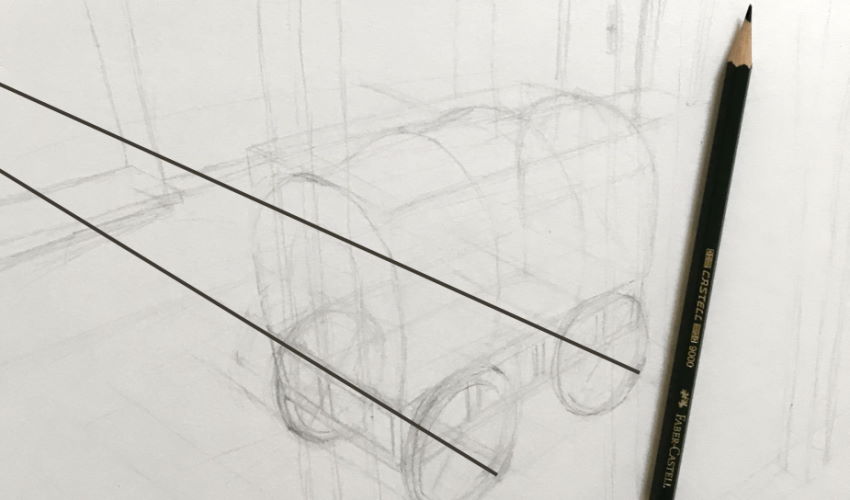
If you start by drawing a box (in perspective), it is easier to see where the vanishing point is (for the wheels).
Important:
Although it is tempting to draw complex objects, start by drawing the basic shapes (circle, square, sphere, cylinder, and box) from different angles.
Complex designs:
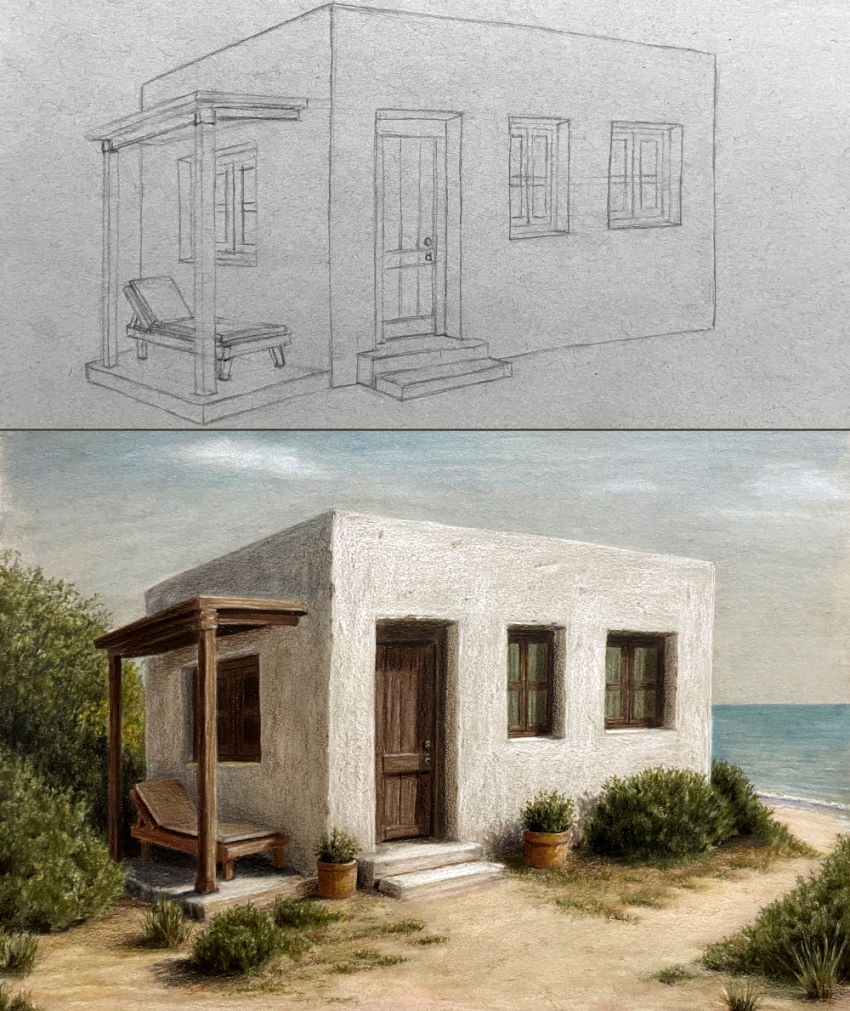
Drawing complex objects often begins as basic shapes that you refine while drawing several sketches.
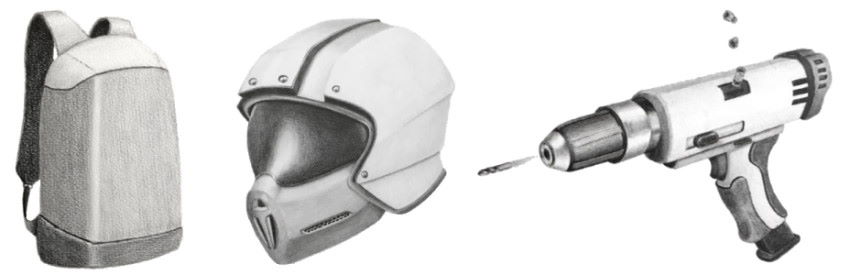
In the following example, I designed something that might be in the James Bond movie category, which is something between concept art and product design.
I usually start with an idea, then some sketches, and lastly refinement and rendering.
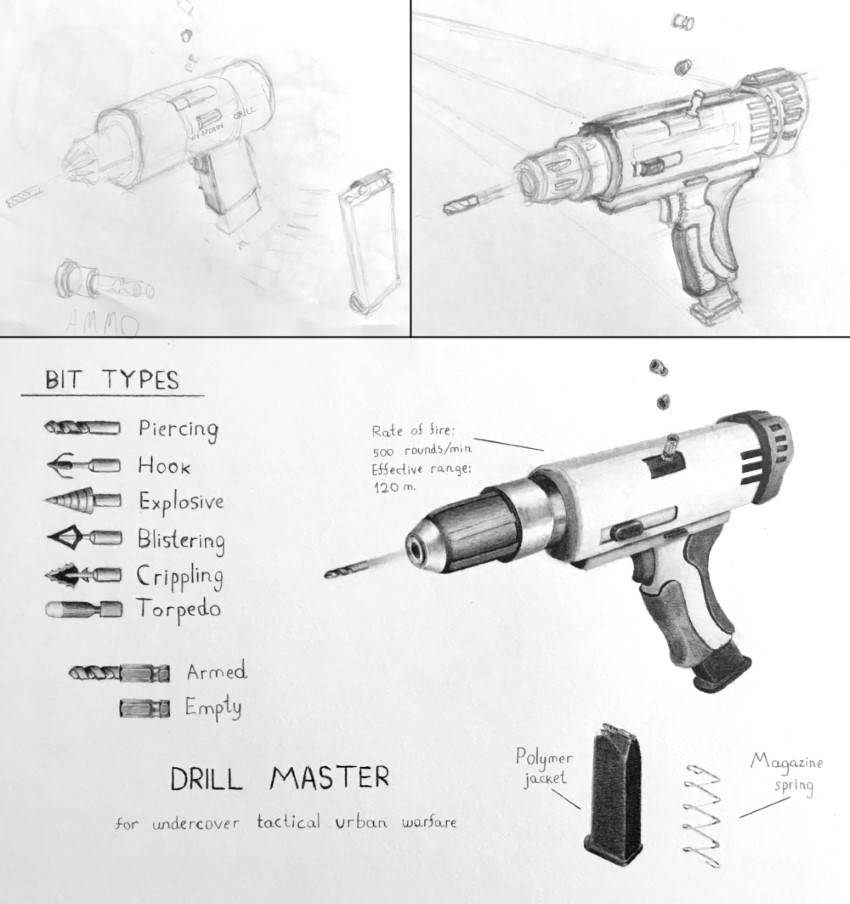
Something to consider:
Drawing concept art is, in a way, inventing something that does not exist.
So, when I decided to draw a weaponized drill, I had to research both drills and guns, learning which parts they are built from and how they work.
It is a good practice to research the subject you draw for ideas and direction.
In addition, it is also advisable to be very loose when sketching various designs and angles before committing to the final design and render.
Organic concept art:
When drawing creatures from imagination, cross-contour is the key for direction and action.

Tip:
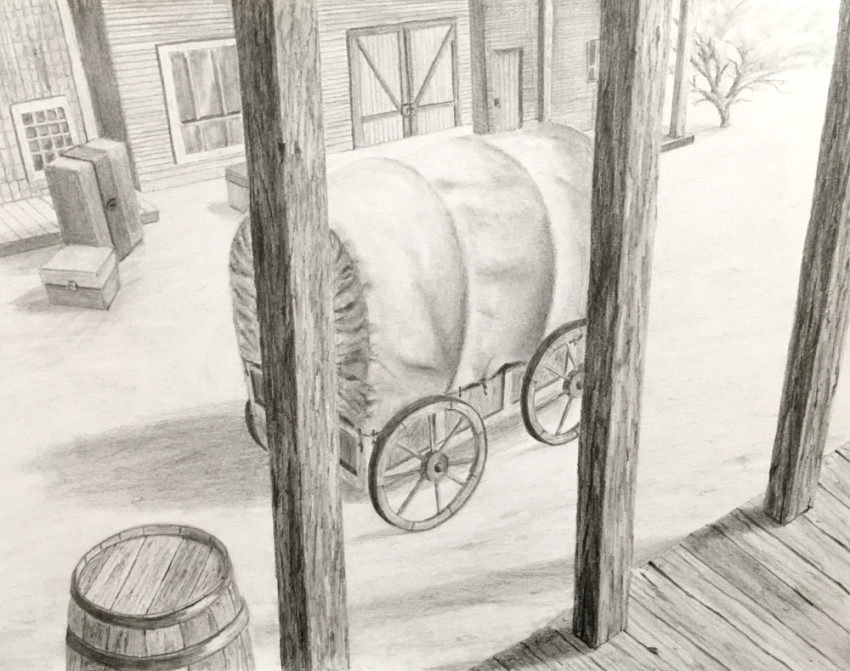
To complete a scene, draw the background too.
Use atmospheric perspective, meaning far parts of the drawing have fewer details, their edges are softer, and they are lighter in value.
The foreground has the strongest contrast between dark and light values.

Product Design
Anything that is man-made has to be designed. Tables, computers, cars, shoes, lamps, houses, etc.
Therefore, a more careful approach is needed when designing a product.
You have to think about level of comfort, usage, safety, materials, price, human factors, ergonomics and other factors, depending on the project.
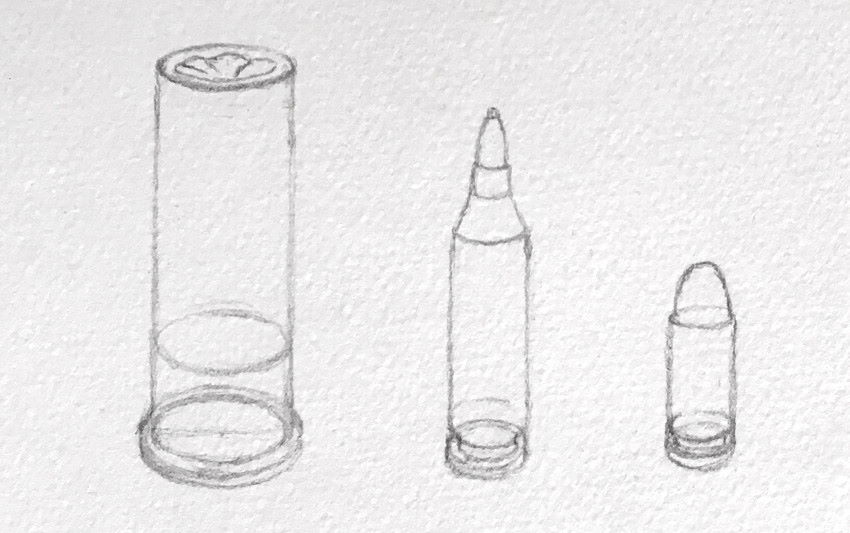
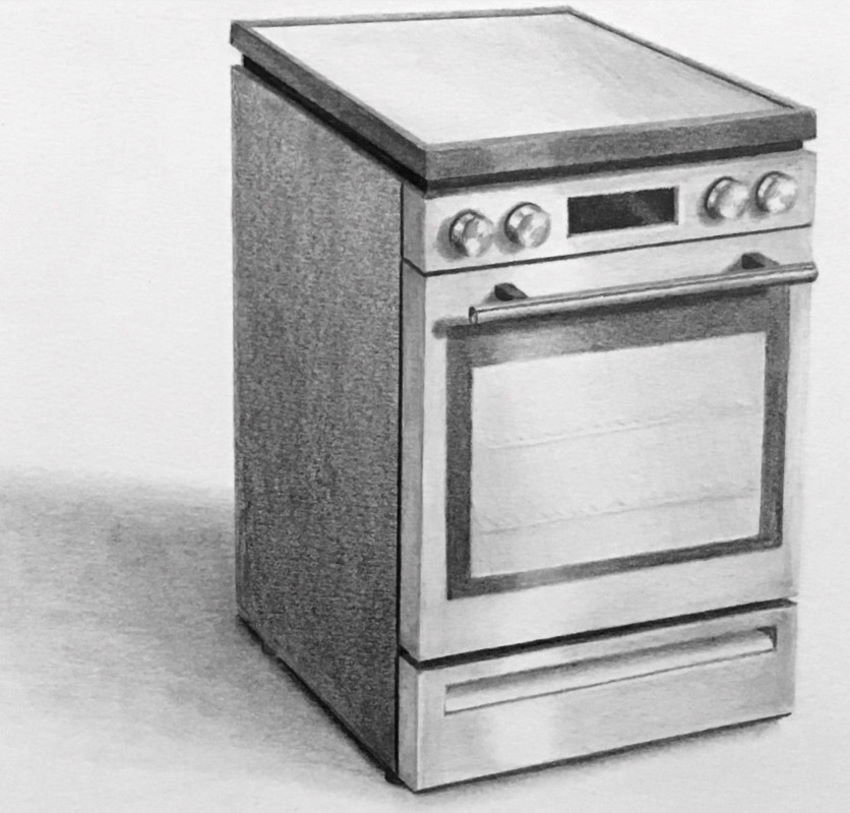
Cylinder-shape products:
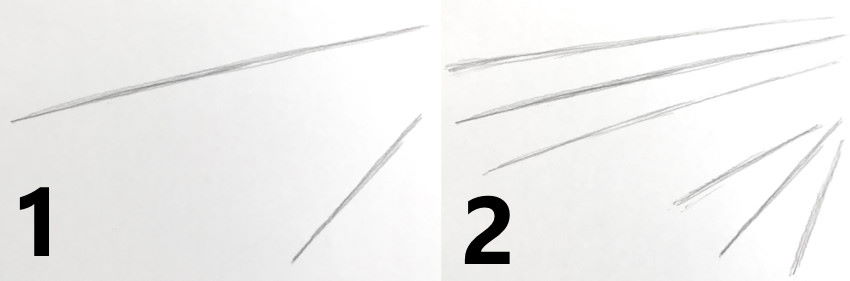
For designing products with a cylindrical shape, you can start with a line.
This line is very important; it is the direction of your cylinder, but also the minor axis for your ellipses.
Draw a short line for a foreshortened body or a longer line for a less foreshortened body.
Now that you have the direction, you can add two lines for the body's width (remember that in perspective, the lines converge to a vanishing point).
Next, add as many ellipses as required for your design.
The farther away an ellipse is, the less it is foreshortened.
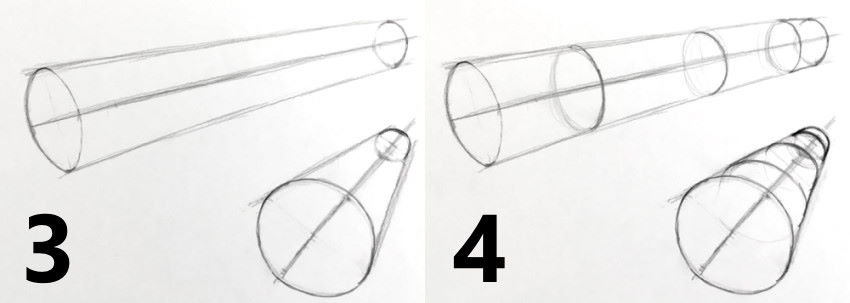
Lastly, finish your drawing and render it.

When an ellipse is in a different direction, the minor axis guides you.
Advanced designs:
Now that you know how to draw boxes and cylinders in perspective, it is time to combine them.
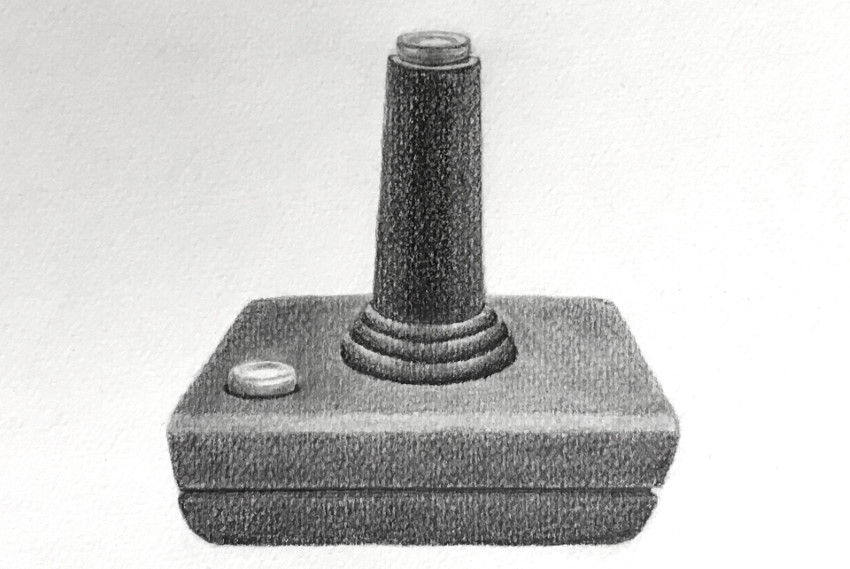
For this example, I designed a classic joystick.
Start by drawing a box and finding its center.
Draw an ellipse in the middle, and raise a cylinder (for the handle).
Draw another ellipse for an elevated button.
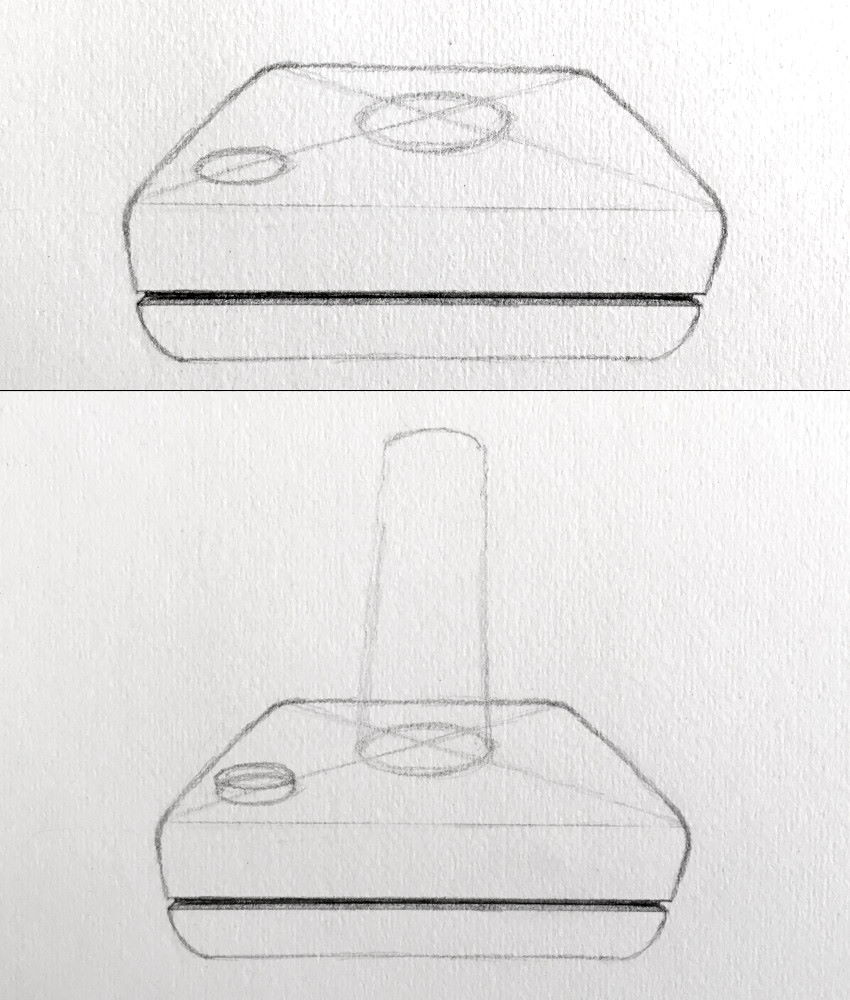
I decided to add another button on top of the handle.
In my first design, the vanishing point is in the middle of the cylinder (red lines).
In that case, the top button cannot be seen, because it is above the horizon line.
The solution is to raise the vanishing point (green lines) and correct the design accordingly.
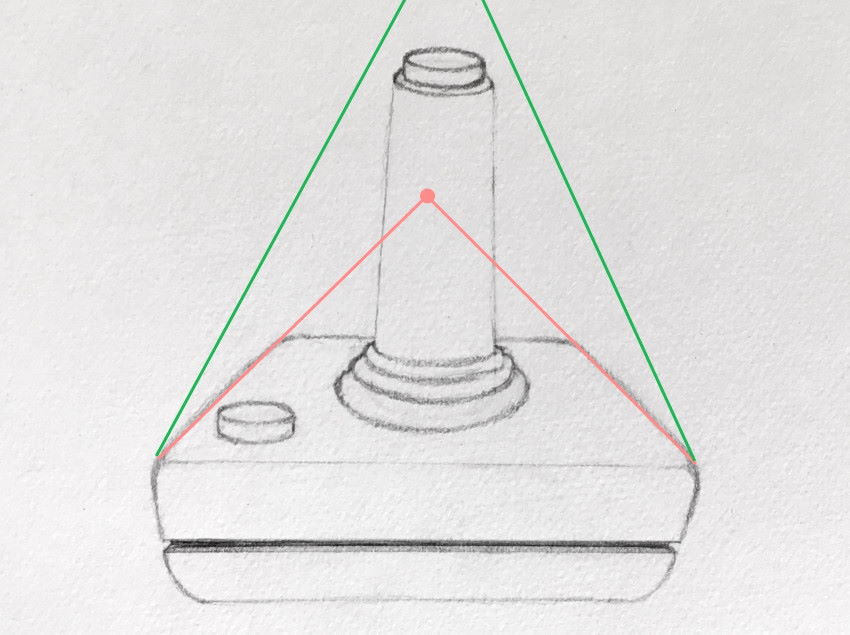
The last step is rendering.
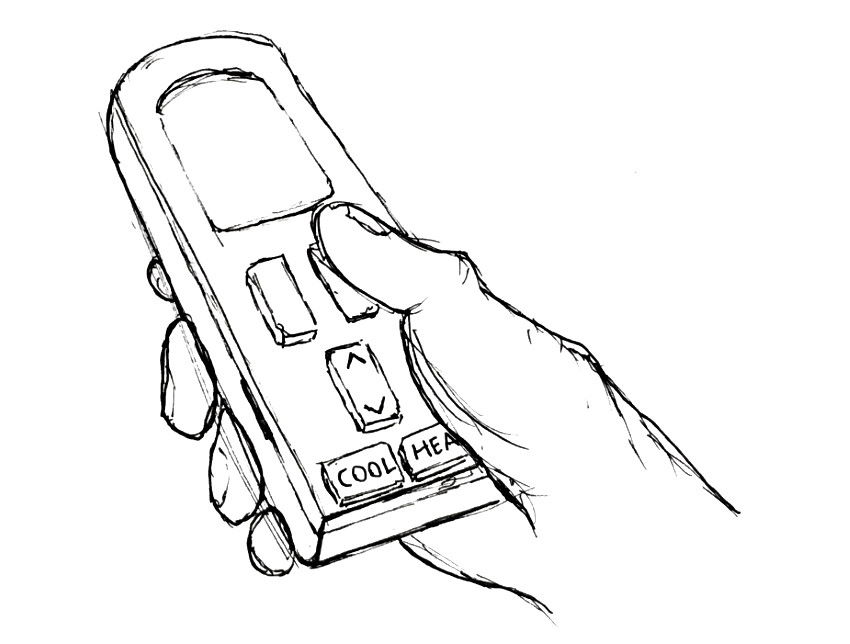
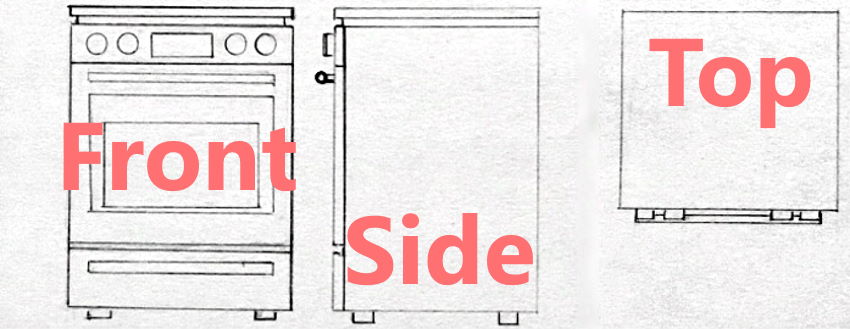
One way to approach product design is to first draw some orthographic views.
Depending on the complexity of the object, sometimes just one or two views are enough. In extreme cases, you might need views from all sides (top, bottom, front, back, left, and right) in order to draw an object from different angles.
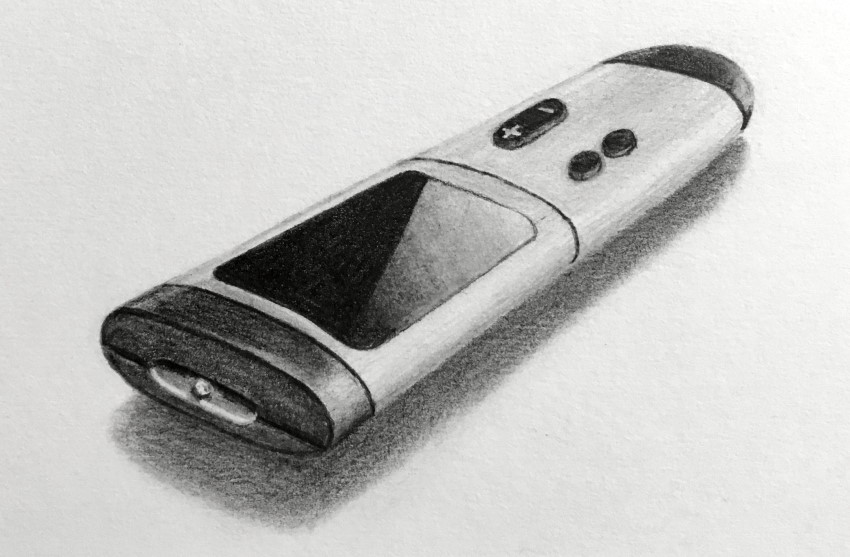
For a remote control, I used side, top, and front views:
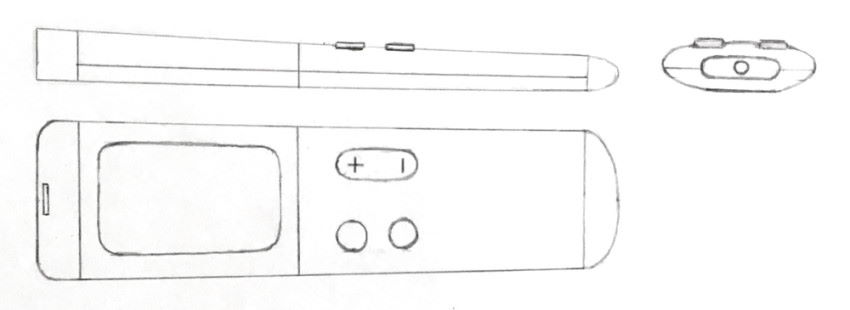
Now it is easier to draw it in perspective, which is more interesting.
In many cases, designing is easier with orthographic views.
After you figure out the design, focus on composition and rendering.
Once you feel comfortable drawing box-shape objects and cylindrical objects (and combining them), you can design complex objects.
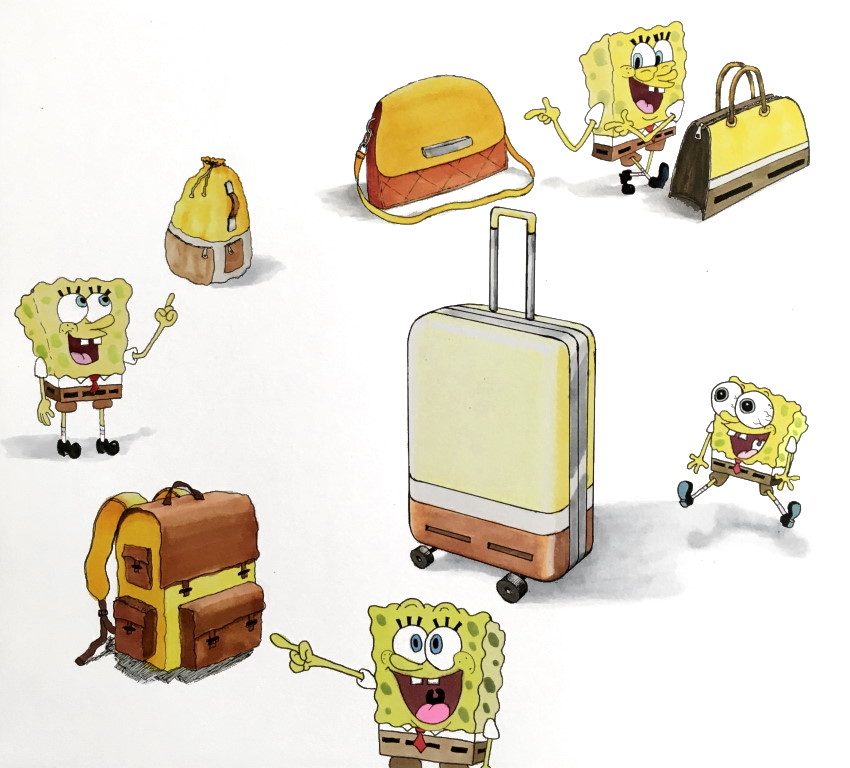
Sometimes, you might want to add context to your designs.
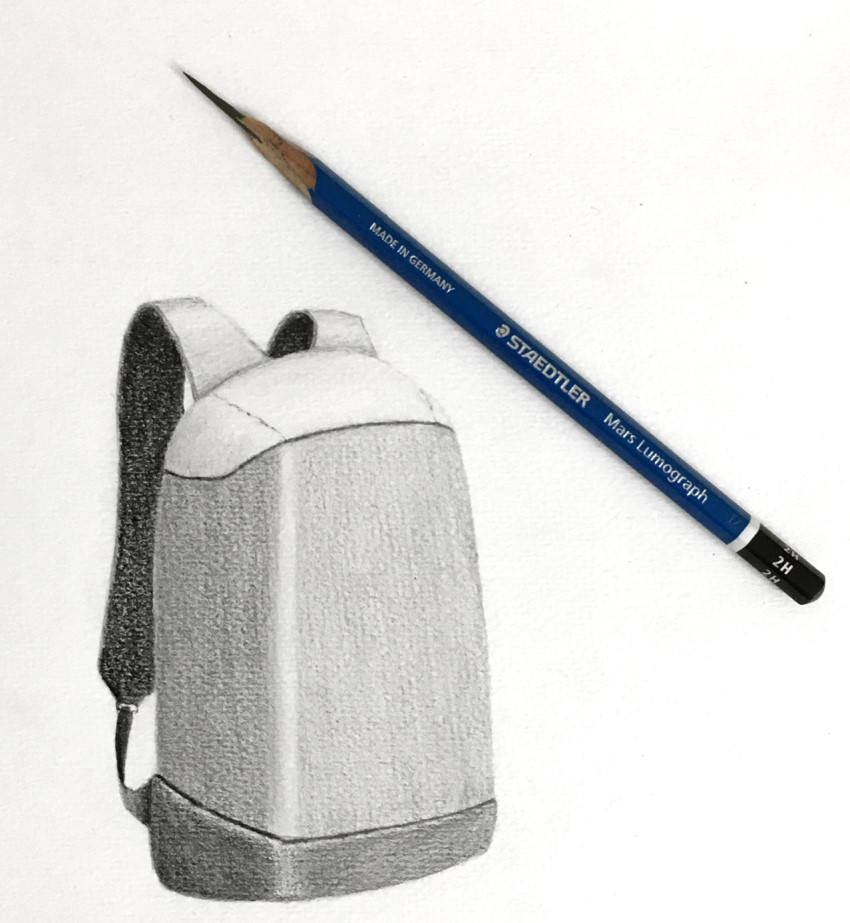
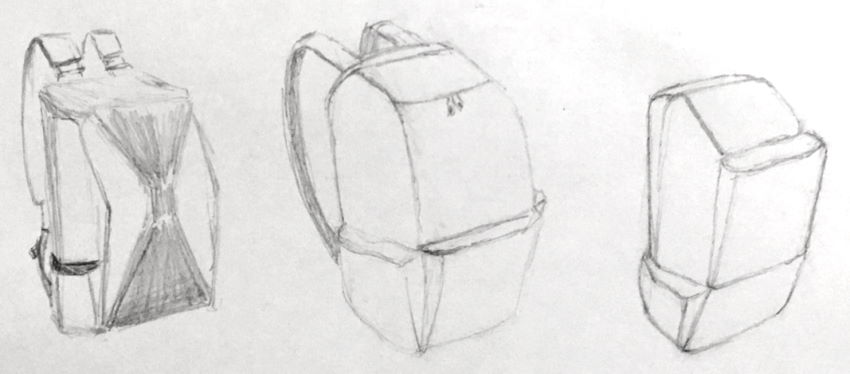
In the next example, I drew some SpongeBob bags and backpacks.
Although the bags are structured in a "square" way and have the SpongeBob color pattern, there is something missing.
That missing thing is context. In this case, I drew some SpongeBob figures.
Whenever I want to draw something for the first time, it can be challenging.
Regardless of my knowledge in perspective, I use these two steps:
1. Search for reference images to understand the structure and functions of the object I want to draw.
2. Draw some quick sketches to explore different design ideas.
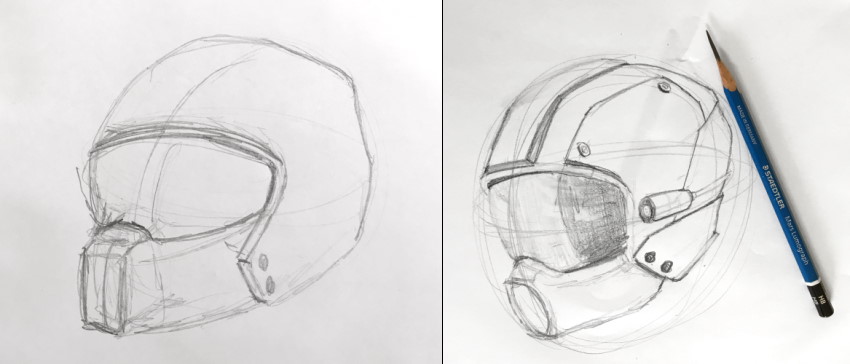
When I decide on a final design, I render it:
Summary
Knowledge and experience in the craft of drawing are the basis for drawing from imagination.
Once you have the knowledge, you can use your imagination, influences and preferences to create your own unique artworks.
If you struggle with drawing from imagination, I suggest practicing first drawing from observation (photos), direct observation (from life), and perspective (learning linear and atmospheric perspective).
With practice, the process becomes natural, and consequently, you will think less about how to draw and more about what to draw.
Recommendation:
Draw lightly at the planning stage, so it is easy to erase and change compositions.
Use quality paper. Here is my review for drawing-paper brands and types.

Note:
As mentioned above, when I draw from imagination, I like to do it freehand, with no rulers or vanishing points.
This results in some sacrifice in accuracy, but I prefer my drawing process to be flowing and enjoyable.
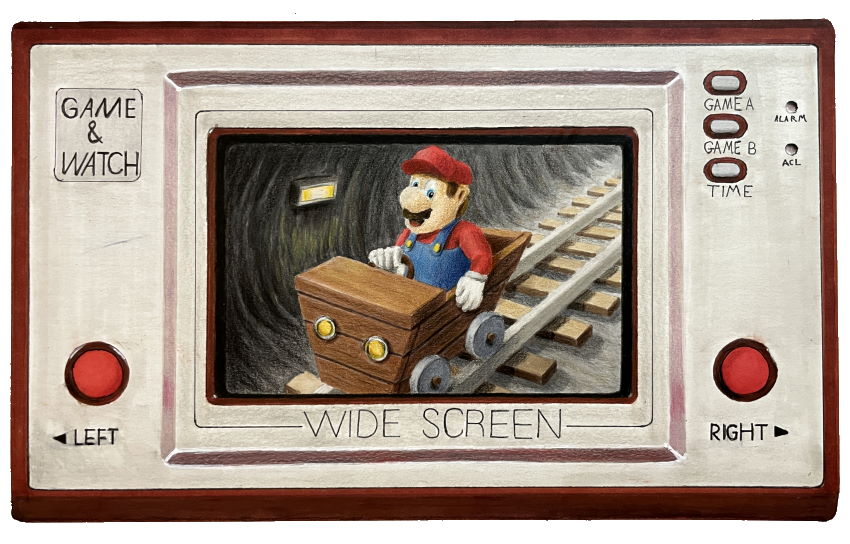
Additionally, I do combine drawing from imagination and drawing from observation.
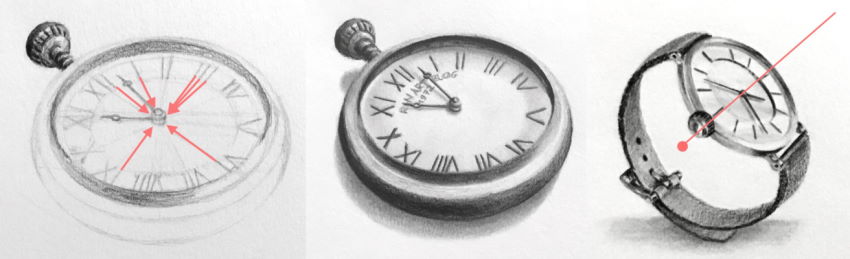
Here is an example of a Game & Watch (a handheld electronic game by Nintendo) from observation and an imaginary scene of Mario.
Where to go next:
To learn more about depth, check out my guide for drawing the illusion of depth. It teaches 15 methods to add depth and space to your art (including MANY examples).

Here are my recommended YouTube channels for learning to draw.